2.2 Multiple workstation setup (KVM switching)

Image 2–2
Connect the cables
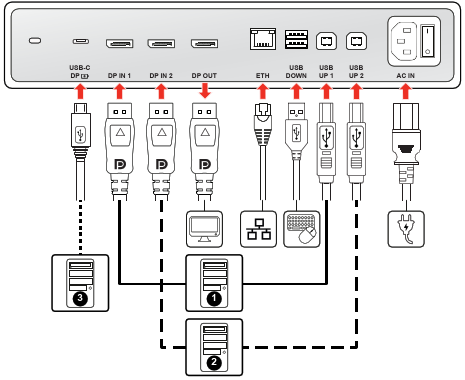
  1. The display has three video inputs available for connecting up to three workstations: DP IN 1, DP IN 2, and USB-C DP. Connect each workstation's video output to a video input on the display.
  2. For workstations connected via DisplayPort, you must also connect the corresponding USB upstream port (USB UP 1 with DP IN 1, USB UP 2 with DP IN 2) to a USB host on each workstation. This connection is required to enable the following features:

    • 3D functionality
    • The display's USB downstream ports for peripherals (keyboard, mouse, etc.)
    • The integrated Ethernet port
    • Registration to QAWeb Enterprise

    For the workstation connected via USB-C DP, a single cable handles all these features directly, so no additional USB cable is needed for that specific workstation.

  3. Connect an Ethernet cable from the display's ETH port to an available network port.

    The display transmits the network signal from the Ethernet cable to the active workstation through the single USB-C cable or the DisplayPort and USB upstream connections.

  4. Connect peripherals to control your workstation (keyboard, mouse, etc.) to the USB DOWN ports on the display.
  5. To daisy-chain your display to a second display, use a DisplayPort cable to connect the DP OUT port to a DisplayPort input on the next display. DisplayPort MST must be enabled in the OSD menu, see “DisplayPort MST (Daisy chain)”.
  6. Connect AC power to the power input on the display.
Route and secure cables
  1. Route all cables through the cable clips in the connector compartment.
  2. Re-install the connector cover: slide the top of the cover in the available recesses, then push the bottom of the cover back into position.
  3. Organize and route all cables through the routing channels in the display stand.
Power on the display system
  1. Switch the power switch to the ‘I’ position.
  2. Press the jog dial to activate your display.
  3. Switch on the workstation connected to your display. Your display will start in a basic video mode at a default refresh rate.
Enable KVM switching
  1. Press/Turn the jog dial to activate the shortcut bar.
  2. Select the OSD menu icon () and press to enter the OSD menu.
  3. Navigate to Image Settings > KVM Switch.
  4. Select Enabled and confirm.
Switching workstations
  1. Press or turn the jog dial to activate the shortcut bar. The KVM switch icon () is now selected by default because the KVM switch is enabled.
  2. Press the jog dial again to switch KVM inputs.
Tip: During normal operation, double-press the jogdial to switch KVM inputs more quickly. A first click will make the shortcut bar pop up, a second click will switch inputs (since the KVM switch icon is selected by default when the KVM switch is enabled).
Note: When switching KVM inputs, the video is switched instantly while switching the USB signal might take a little longer (up to 2 seconds).
Install software and drivers
  1. 3D driver (Required for 3D): This driver is required to use your display's 3D functionality. You can download and install it from https://www.barco.com/support/eonis-3d-mdrc-8127/drivers.
  2. Barco video driver and Intuitive Workflow Tools (Recommended): If you are using a Barco display controller, install the drivers and Intuitive Workflow Tools from the software package available at https://www.barco.com/support/intuitive-workflow-tools/drivers.
  3. QAWeb registration (Recommended): QAWeb helps you manage quality and assure compliance of your expanding healthcare enterprise with less effort, lower cost, and complete confidence. This fully automated and secure system supports a consistent image quality and uptime for all registered imaging display systems within your facility and across your enterprise.

    To register your display system to your QAWeb organization, the QAWeb Agent must be installed and running on your workstation and it must be able to communicate with the QAWeb cloud service. Learn more at www.barco.com/qaweb.