
Testing ClickShare Conference peripheral functionality in Windows can be done without using specific conferencing software (UC&C tool such as Skype4Business, Teams, Zoom, Webex,...) since ClickShare Conference makes your peripheral device available in Windows.
In what follows, the speakerphone and camera or speakerphone with an integrated camera are connected to the CX Base Unit and the Button is inserted into a Windows PC.
Info! Depending on the nature of the peripheral (camera, speakerphone or all-in-one device), either the audio playback & recording, video streaming or both audio playback & recording and video streaming should be tested. Visit the supported peripherals overview page on the Barco website to find the list of supported peripheral devices.
Testing audio playback and recording
- In Windows 10, type "Sound" in the search bar and then select Sound Control Panel. In Windows 7, right-click on the speaker icon in the notification area of your Windows taskbar and select Playback devices.

- A window opens listing all the playback devices currently attached to your notebook.
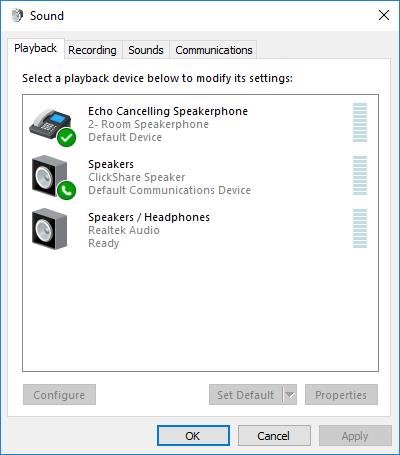
- Double-click on Echo Cancelling Speakerphone and a new window will appear.

- Select Advanced and you will have the following view.

- Click the Test button to play a sound, if you hear the test sound from the connected speakerphone, you have successfully tested audio playback from your notebook to the speakerphone! Next, close this window and return to the window below.

- Now select Recording and you are presented with a view as below.

- Focus on the entry Echo Cancelling Speakerphone and generate a sound towards the speakerphone. The volume meter will indicate that sound was picked up by the speakerphone and you have successfully tested audio recording with your notebook from the speakerphone!
Info! Make sure that you avoid that a built-in mic, for example, might pick it up, to ensure the correct device is selected.
Testing video recording/streaming
- Start the built-in Windows 10 Camera app, which allows previewing all internal and USB connected cameras. The following window shows:

- If the Room Camera is not selected, use the icon on the top right to select Room Camera. When changing the camera, the name of the camera will be shown for a couple of seconds.

- When starting up the Room Camera video stream, it is normal to see a static image for a couple of seconds. When the video stream starts coming in, you have successfully tested video recording with your notebook from the camera!
Testing touchscreen
- One-Touch on screen (same as left-click by mouse) after Clickshare projection, launch Microsoft Paint from the desktop/laptop, then on the touchscreen, choose "Pencil". It will choose the Pencil function successfully.

Then, use your finger to start drawing. The drawing action should be smooth without offset. Compare the desktop/laptop and the touchscreen to ensure the drawing display the same.

- Long press on the screen (same as right-click by mouse)
After ClickShare projection, long press with a finger on the touchscreen. It will display the content menu successfully

- Functionality of drag
After ClickShare projection. choose one icon (ex. Word, Paint, Excel...) on the touch screen with a finger then drag to another location.

After releasing the finger from the touchscreen, the icon will move to the new location successfully.

- Double-Touch on screen
After ClickShare projection, double touch on an icon (ex. Word, Paint, Excel...) with a finger on the touchscreen, the file will be opened successfully.
- Multiple select and drag
After ClickShare projection, touch any empty area with a finger and select apps, then drag to another location. It will display a blue box in selection during the drag action. After releasing the finger on the touchscreen, the selected files will be highlighted.

- Different resolution
Set different display resolution 640x480, 1280x720, or 1920x1080 from the laptop/desktop. Launch ClickShare and project. All the touch functions such as one-touch, long press, double-touch in these respective resolutions still work successfully.
Related articles:
- Testing peripheral's functionality with ClickShare Conference Base Unit without UC&C tools on macOS
- What peripherals can be used with ClickShare Conference and are there any limitations?
- Different ClickShare Conference Interoperability levels explained
- How to select the ClickShare Conference peripherals in your UC&C tool

