6.5 Mounting the projector, general considerations
Mounting safety
When mounting a projector in a rig, always use an interface plate (between the projector and the mount) that has provision for a safety wire or another safety mechanism, to ensure that the projector does not fall down should the interface plate come loose from the mount.
Always screw the interface plate securely to the projector body while the projector is on the ground (i.e. cannot fall down). Then attach proper safety wire between the interface plate and the rig before mounting the projector in the rig
Using 3rd party mounting equipment
The projector has features for mounting into various system environments using 3rd party mounts.
Four mounting inserts are located on the bottom of projector. The ceiling mount inserts have a pull-strength of more than 4x the weight of the projector.
The feet can also be removed if appropriate for the mounting accessories. Do NOT use the threaded holes for the feet for other attachment devices.
Warning: The projector feet tread holes must NOT be used as a anchor point for ceiling mount. They are only intended to be use with the feet, on a flat surface.
Note: Where possible, the projector lens must be positioned exactly perpendicular to the center of the screen. Use the projector offset (lens shift), rather than physical angling, to correct any off-center positioning.
Caution: The position and physical securing of the projector must be sufficient to prevent it from accidental or involuntary movement. Proper securing of the projector is the responsibility of the installer and user.
Caution: Always use a Rigging Frame when the projector shall be mounted in other ways than on the feet, on a flat surface.
Note: Installation and use of the Rigging Frame are described in document R5906768 F90 Multifunctional Frame — Installation Manual.
Note: The threaded hole in the lower back end of the projector is NOT suitable for lifting or other heavy operations. Only for adjustment purposes.
Mounting on a flat surface
Position the projector at the desired location.
Power up the projector.
Go to Main Menu / Test Patterns and select an internal hatch pattern to display on the screen.
Adjust the projector legs until the projected hatch pattern is a level and perfect rectangle.
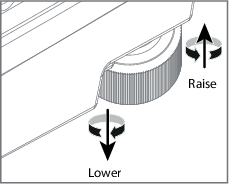
Adjustable feet
Twisting the adjustable feet in either direction, left or right, allows you to fine-adjust the projector position for precise vertical mechanical alignment.
Image 6–4
Mounting to a ceiling
Install the projector in to an approved rigging frame.
Install the rigging frame to the desired location.
Power up the projector.
Go to Main Menu / Installation / Orientation and select the correct orientation for your setup.
Go to Main Menu / Test Patterns and select an internal hatch pattern to display on the screen.
Adjust the position (height and angle) of the rigging frame until the projected hatch pattern is a level and perfect rectangle.
Note: If applied in a motion rig, care must be taken to stay within the environmental specifications for vibration and shock. It may also be necessary to use additional, custom means to stabilize the projection lens to make sure that the projected image remains in position and properly focused.