Button layout
A Button consists of three main components.
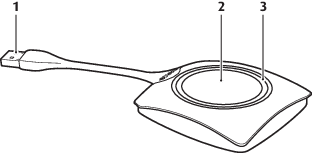
| 1 | USB connector |
| 2 | Button |
| 3 | LED ring |
A Button consists of three main components.
| 1 | USB connector |
| 2 | Button |
| 3 | LED ring |
Using the USB connector the Button can be plugged into a laptop (for sharing your screen) or the Base Unit (for pairing the Button to the Base Unit or updating its software). Button R9861500D1 has a USB Type-A connector, Button R9861500D1C has a USB Type-CTM connector. Depending on the type of USB port on your laptop or on the Base Unit a convertor must be use.
Click the Button to display the content of the laptop's screen on the meeting room display. Clicking the Button during the meeting will toggle the sharing of the screen.
The LED ring indicates the current status of your ClickShare.
| LEDs behavior | Explanation |
| white blinking |
|
| static white |
|
| static red |
|
| red blinking |
|
| off (no light) |
|
The label at the bottom of the Button contains:
[4] While sharing content, the laptop will not go to standby. Once sharing is stopped, the laptop will again be capable of going to standly.