Front and Top layout of the Base Unit
At the front of the Base Unit you can find a standby button and two USB ports. Status LED is mounted at the left of the standby button.
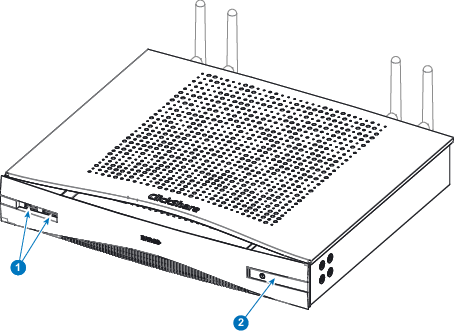
| 1 | 2x USB port 3.0 |
| 2 | Standby button |


At the front of the Base Unit you can find a standby button and two USB ports. Status LED is mounted at the left of the standby button.
| 1 | 2x USB port 3.0 |
| 2 | Standby button |
The USB ports (front or back) are used to update the soft- and firmware of both the Base Unit and the Buttons. To pair the Buttons, connect the touchscreen and saving blackboarding/annotation screen to USB stick[2].
When plugging in the Button into the Base Unit, the Button is paired to the Base Unit. The Base Unit checks whether the Button's software and firmware are up to date. If not, the Base Unit updates the software and/or firmware.
To update the Base Unit software, download the latest version of the software from the Barco website. Copy the file on a USB stick and plug it into the USB port of the Base Unit. Follow the progress and instructions on the display.
The color of the LED at the front of the Base Unit give information on the status of the system.
| LEDs behavior | Explanation |
| static red |
|
| blinking white |
|
| breathing white |
|
| static white |
|
| red blinking |
|
| dark |
|
The button at the front of the Base Unit has a standby function once the Base Unit is powered
The connection panel is situated at the back of the Base Unit.
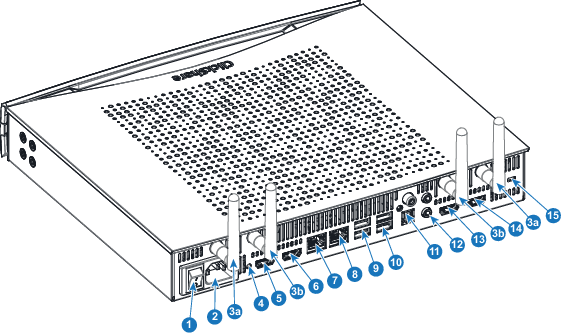
| 1 | Rocker switch |
| 2 | Power connection |
| 3a | Fixture point for antenna Wi-Fi 1 |
| 3b | Fixture point for antenna Wi-Fi 2 |
| 4 | Reset |
| 5 | HDMI out 1 connector |
| 6 | HDMI out 2 connector |
| 7 | LAN 1 connector (primary LAN interface) |
| 8 | LAN 2 connector (secondary LAN interface) |
| 9 | USB connectors 3.0 |
| 10 | USB connectors 2.0 |
| 11 | Audio connectors |
| 12 | Audio connectors |
| 13 | HDMI in 1 connector |
| 14 | HDMI in 2 connector |
| 15 | Kensington lock |
The rocker switch is used to power on and off the Base Unit.
The mechanical fixture points are located at the bottom of the Base Unit
Four antennas are included in the CSE-800 box for concurrent dual band Wi-Fi. To avoid damage during transport, they are not pre-mounted.
The antennas can rotate for a better wireless connection.
Usage of antennas other than the ones provided with the unit are allowed within the restrictions on usage of other antennas defined by local regulations. Barco does not take responsibility for damage or disturbance of other devices that may be caused by using a different antenna. The use of an active power amplifier is not allowed.
Antenna type : Dipole
Gain : Maximum 2 dBi peak gain in 2.4GHz and 5Ghz band
Ventilation grids are foreseen on the front side and on the back sides of the Base Unit.
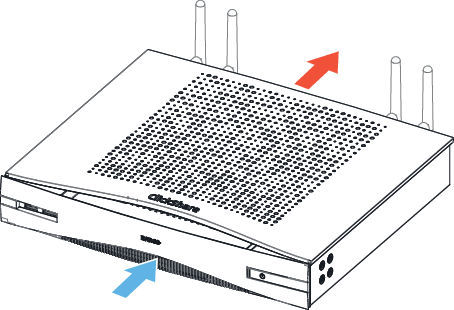
The Base Unit sucks air via the front side ventilation grid and push hot air out on the back side ventilation grid.

The serial number label containing the Barco part number, the revision number, production date (week-year) and the serial number.
The product label with the applicable certification logos.
The product label contains:
Bluetooth functionality is currently not available and Bluetooth signal is disabled.
[2] touchscreen connection, blackboarding/annotation screen saving will be available in future releases