Overview
The following table gives an overview of the different functionality of the keys.
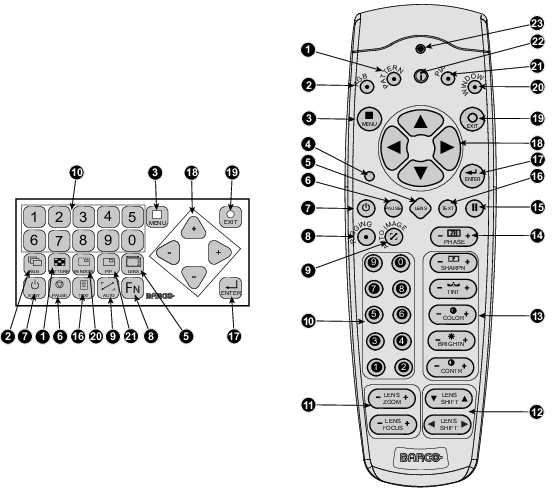
| Ind. | Key name | Description |
| 1 | Pattern key | Direct access key to the internal pattern selection menu. |
| 2 | RGB | Toggle key to enable and disable colors in the adjustment mode. Toggle between red, green, blue and full RGB. |
| 3 | MENU | Access key to the menu structure and key to quickly quit the adjustment menus. |
| 4 | Address key | (recessed key), to enter the address of the projector (between 0 and 9) in the remote control. Press the recessed address key with a pencil, followed by pressing one digit button between 0 and 9. |
| 5 | LENS | Direct access key to the lens adjustment menus. Toggling this key will change the projected pattern. |
| 6 | PAUSE | To stop projection for a short time, press 'PAUSE'. The image disappears but full power is retained for immediate restarting. Shutter is closed. |
| 7 | STBY | Standby function switch off the lamp and lamp electronics. The lamp cooling fans remain active for about 5 minutes. The speed of the other fans is reduced. |
| 8 | FN | FN toggles the local display to preview an input |
| 9 | Auto | Auto alignment at first access. |
| 10 | Digit buttons | Direct input selection or numeric entries |
| 11 | Lens zoom/focus | Zoom and focus controls of the lens |
| 12 | Lens shift | Shift control of the lens, to shift the lens up/down or left/right |
| 13 | Picture controls | Use these buttons to obtain the desired picture level. |
| 14 | PHASE | Used to remove the horizontal instability of the image (usually for RGB source). It adjusts the phase of the pixel sampling clock relative to the incoming signal. |
| 15 | FREEZE | To freeze the actual projected image. |
| 16 | TEXT | Toggle key to activate or deactivate on screen text boxes while adjusting a setting. When adjusting one of the image controls, e.g. during a meeting, the normally displayed bar scale can be deactivated by pressing 'TEXT' key first. To re-display the bar scale on the screen, press 'TEXT' key again. When TEXT is 'off', no adjustment menu's will be displayed on the screen when entering the adjustment mode. All menus and adjustments remain active on the local LCD panel. |
| 17 | ENTER | Key to confirm an adjustment or selection in the adjustment mode. |
| 18 | Cursor keys | To make menu selections when in the adjustment mode |
| 19 | EXIT | Key to go one menu stage higher than the actual position when in the adjustment mode. |
| 20 | WINDOW | Selection of the active window “Main” or “PiP” |
| 21 | PIP | Direct access key for picture in picture selection. |
| 22 | Info | Displays help information when on a certain menu item of the sofrware |
| 23 | RC Operating indication | Lights up when a button on the remote control is pressed. (This is a visual indicator to check the operation of the remote control) |