Required tools
No tools required.
No tools required.
Make sure that the internal hatch pattern projected by the reference projector is sharp and has a perfect rectangle outline. If this is not the case, readjust the reference projector before aligning the other stacked projector(s) with the reference hatch pattern.
Project with the stacked projector the same internal hatch pattern as the reference projector.
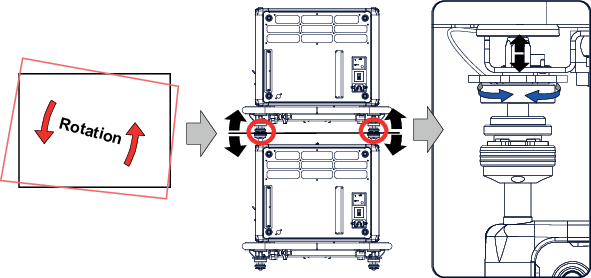
If necessary, adjust the rotation of the stacked projector with respect to the reference projector by turning in or out the height adjustment ring of the interlocking adaptors at the rear of the stacked projector. Adjust until the outline of the hatch pattern is most symmetric with the reference hatch pattern.
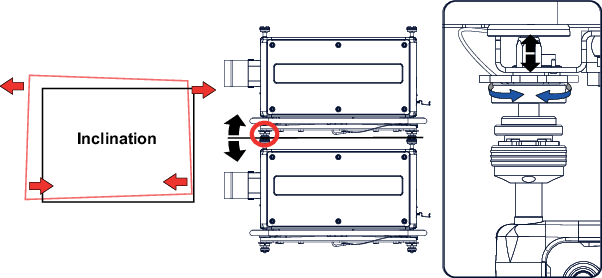
If necessary, adjust the inclination of the stacked projector with respect to the reference projector by turning the height adjustment ring of the interlocking adaptor at the front of the stacked projector in or out. Adjust until the outline of the hatch pattern is most symmetric with the reference hatch pattern.
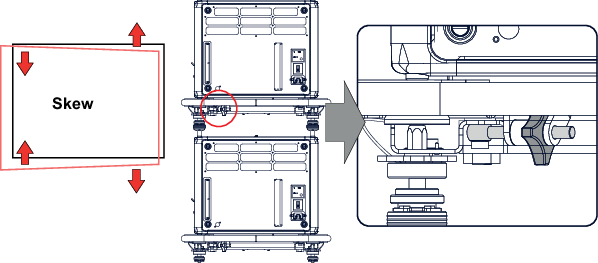
If necessary, adjust the skew of the stacked projector with respect to the reference projector by turning the Hand screw in or out. The hand screw is located at smallest side of the carrying handle (front or back). Adjust until the outline of the hatch pattern is most symmetric with the reference hatch pattern.
Shift the hatch pattern horizontally and vertically until the outline of the hatch pattern is most symmetrically placed with respect to the reference hatch pattern.
Zoom the hatch pattern in or out until the outline of the hatch pattern matches exactly the outline of the reference hatch pattern.