6.26 Programming Menu > Adjustment area > Layer configuration

General

In the Layer menu, users can manage the layer in the selected destination and update its attributes.

Layer configuration menu description

Layer configuration menu is accessed by clicking on the Layers tab.
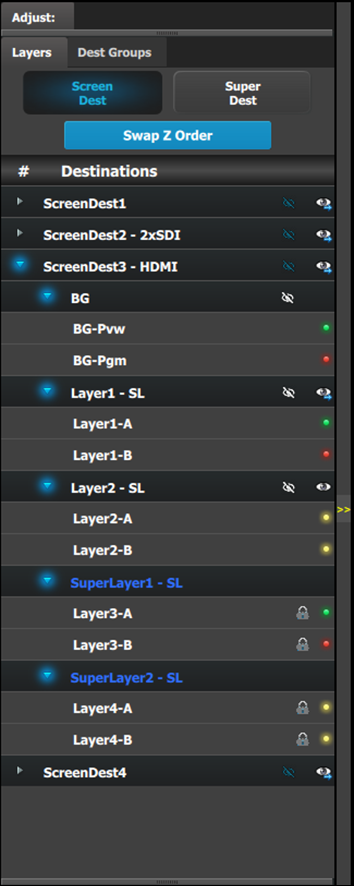
This menu provides:

  • A button to select Screen Destinations and a button to select Super Destinations.
  • A Swap Z order button that allows for layers that are in the same Destination and of the same size and type to be swapped.
  • A list of the available Screen Destinations (or Super Destinations) and the layers associated with each Screen or Super Destination.

    • Destinations: Provides list of all destinations that are available in the Programming page. Each destination can be expanded to reveal the Background and the layers assigned to them.

      • The outlined “eye” with a backslash through it acts as a toggle to hide or show the BG and Layers to the Relative Preset recorder.

        When the icon is white, the item is "shown"; when the icon is blue, the item is "hidden." When the BG or Layers are "Hidden" they may or may not be in use in the workspace, and they will not be part of the "snapshot" taken when a Relative Preset is saved and recalled.

      • The filled-in “eye” icon clears or replaces the layers from the Preview destination.

        This button works in a toggle mode. When a small blue arrow is indicated below the eye, the layer is on Preview. If no blue arrow is evident, the layer is cleared from Preview.

    • BG and ScreenDest: Backgrounds and Destinations layers can be further expanded to reveal the A and B sources that are used in the transitions.
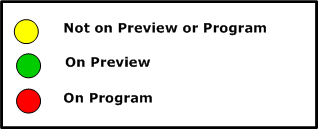
    • LEDs: The LEDs provide an indication of the “A” and “B” backgrounds or layers.

      Note that there is no A or B side of the scaler, only A and B usage, all layers are independent of each other in respect to Z-order.

      Image 6–84
Swap Z order rules

There are several rules that apply when changing Z order:

  1. Can only swap Z order on layers in the same Destination.
  2. Can only swap Z order on layers that are of the same size (SL, DL, or 4K) and type (Mix or Single).
How to swap Z order
  1. Click on Swap Z order button to enter in the Swap Z order mode.
  2. Click on 1 layer at a time and drag it to a different location in the list.
How to access the layer adjustments

Adjustments to layers are performed in the “Adjust” panel:

  1. Select the layer from the list on the Layers tab.

    or

    Select the layer from the preview canvas.

    The layer is selected.
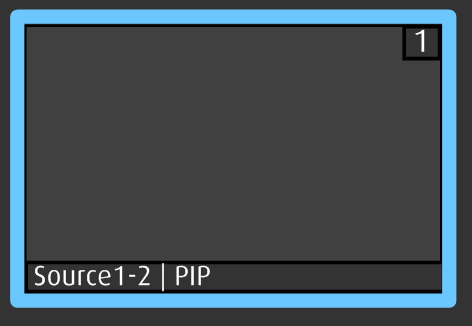
    Image 6–85

    When the layer is selected and is visible on the canvas, it will have a blue highlight around the layer.

  2. Click on the Adjust tab that is on the top of the adjustment area.

    The layer adjustment panel is displayed.

Note: It is possible to select multiple layers by clicking on the each targeted layer once Multiple Select is set to ON.
Layer adjustment panel description

The Layer adjustment panel allows access to general layer adjustments and affects only selected layers.

Note: Layer adjustments are performed on individual layers. When multiple layers are selected, the adjustments are disabled.

The upper part of the panel includes Layer Type and Keyframes.
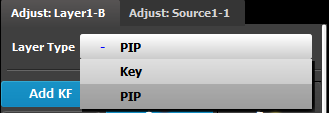
  • Layer type: Layer can be a PIP or a Key. The available adjustments depend on the selected mode.
  • Keyframes: There are 2 KeyFrames per layer.

The lower part of the panel provides menus for layer sizing and color adjustments

  • Main adjustment : Border and Shadows
  • Layer Window adjustment: Size, Position, Mask
  • Layer Color Effects adjustment: Brightness, Contrast, Gamma, Hue, Saturation, Monochrome, Invert
PIP / KEY selection

The first selection is the choice for the layer type: PIP or a Key. Depending on the selection, the rest of the menu will adapt.

Keyframes

In a PIP “move,” Keyframe is a point where an action or a change occurs. For example, a PIP movement is described by two keyframes. The first keyframe is the state of the PIP at the initial point of the movement. The second keyframe is the point where the PIP moves to. The size and color attributes can also change during the move.

By default, the initial position and state of the layer is keyframe 1. The user can change the size, and change the border and shadow parameters before defining Keyframe2. After changes are done to Keyframe1, the second keyframe can be added by pressing the “Add KF” button. A new position and size can be defined and adjustments to the border and shadow parameters to define the second Keyframe.
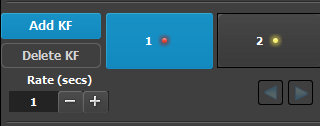
Image 6–86

Once the two keyframes are defined, the PIP can move between the two positions by pressing the green arrow buttons. The rate for the movement is adjusted by changing the number in the corresponding box.

Any of the two keyframes can be deleted when the keyframe is highlighted and by pressing the “Delete KF” button.

The red LED in the keyframe button indicates the current position of the PIP.

Layer adjustment panel > Main adjustment

The Main adjustment panel is variable according the Layer type.

Layer type = PIP (Border Tab):

This menu allows users to adjust the PIP borders.
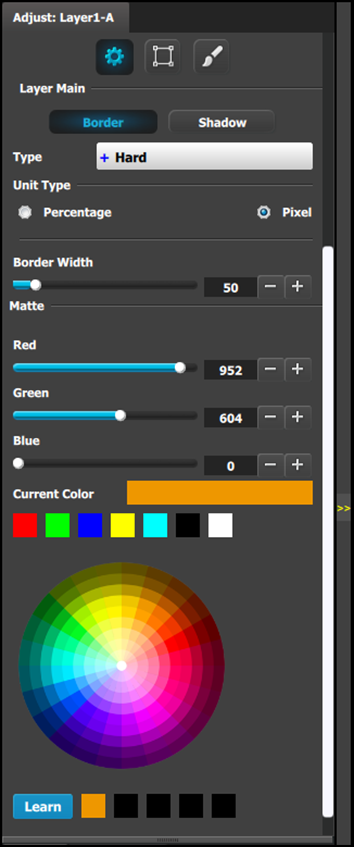
  • Borders are enabled by selecting the type to apply. Six choices are available:

    • Off
    • Hard
    • Soft
    • Halo
    • Halo-in
    • Halo-out
  • Border width and color are selected by adjusting the corresponding sliders or entering a figure in the adjacent edit boxes. The border width can be entered either in Percentage of the vertical size or in pixels.
  • The selected color is shown in the Current Color bar. The color can also be stored by clicking in one of the square boxes at the bottom of the menu next to the Learn button. These boxes are quick shortcuts to select that color for the Border.
  • Another way to specify a color is to click on the Color wheel. The slider values will change accordingly as the mouse moves around the color wheel.
  • Learn: The “Learn” button in the bottom is a way to store custom colors to be used for later. The way to use this area is to:

    1. Pick a color to save, using color wheel or the R/G/B adjustments.
    2. Click Learn button.
    3. Click any one of the buttons on the right.
    4. The color that was picked is now stored in this button.

Layer type = PIP (Shadow Tab):

The Shadow Menu enables the user to place a shadow behind a PIP.
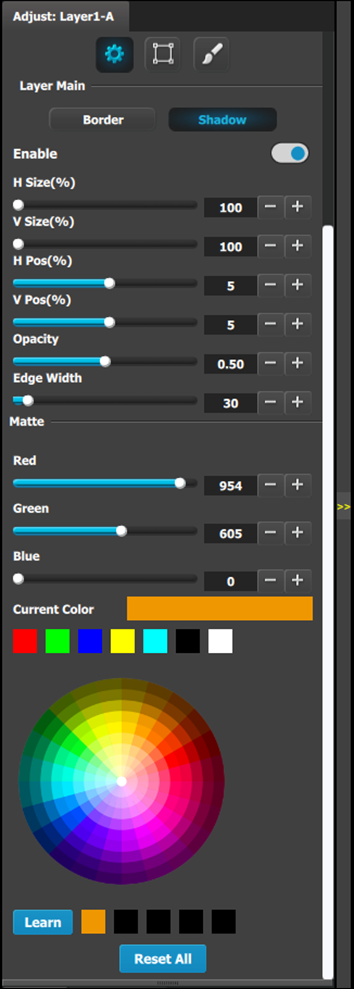
The following functions are provided:

  • Enables or disables the PIP’s shadow.
  • H Size (%): Adjusts the shadow’s horizontal size as a percentage of the PIP’s size.
  • V Size (%): Adjusts the shadow’s vertical size as a percentage of the PIP’s size.
  • H Pos(pixel): Adjusts the shadow’s horizontal position in pixels.
  • V Pos(pixel): Adjusts the shadow’s vertical position in pixels.
  • Opacity: Adjusts transparency, from 0 (transparent) to 1024 (opaque).
  • Edge Width: Adjusts the width of shadow creating a halo type of an effect.
  • Color Selection: Adjusts the shadow’s color with the help of the slider, or with the color wheel.
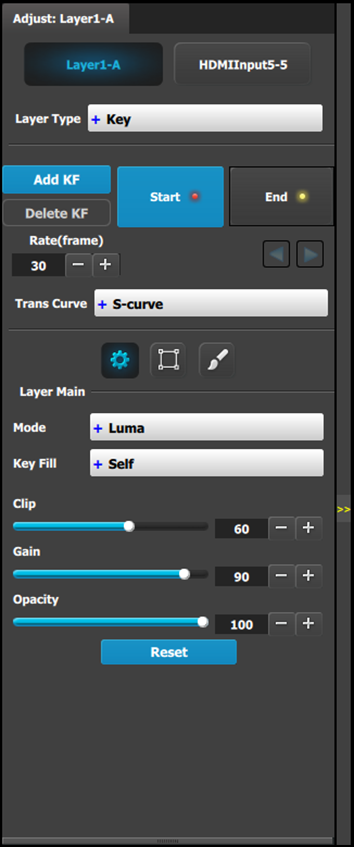
Layer type = Key; Mode = Luma

A Luma (Luminance) Key is one in which the hole-cutting information is derived from the luminance (brightness) level of the key source.

Source on the Key Bus can be selected as the “cut.” You can select Self or Matte, Preset Bus, or Cut + Fill for the “fill” source.

Clip: Adjust the threshold of the video that “cuts” into the background. A hole is cut into the background anywhere that foreground luminance is greater than the clip level.

  • Range: 0 to 100, in .01 increments
  • Default: 60

Gain: Adjust the sensitivity of the key, enabling you to change the sharpness of the keyed image. Gain only affects the edge of the key hole, as set by the clip.

  • Range: 0 to 100, in .01 increments
  • Default: 90

Opacity: Adjusts the opacity of the keyed image, from fully opaque to fully transparent.

  • Range: 0 to 100, in .01 increments
  • Default: 100.00

Reset: Press to return all clip, gain and opacity settings to their default values.

Layer type = Key; Mode = Chroma

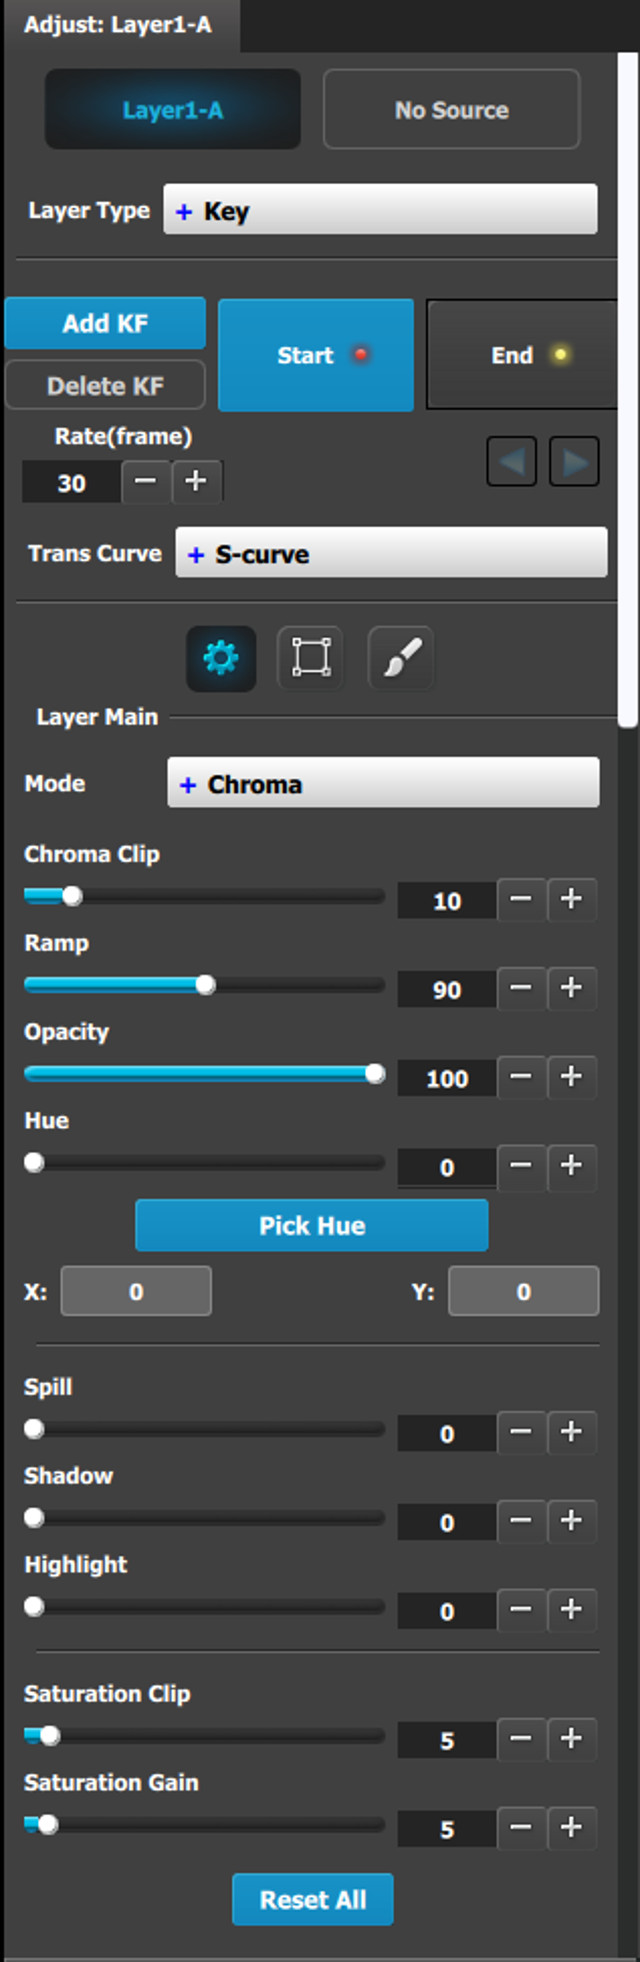
A Chroma (Chrominance) Key is one in which the hole-cutting information is derived from a color in the key source.

After selecting a Hue color to key out, it may be necessary to make additional adjustments to improve the look of the overall compositing effect.

Chroma Clip: This is an angle, centered around the Hue color. Any color inside this angle is fully keyed out.

  • Range: 0 to 100
  • Default: 10

Ramp: This is an angle, also centered around the Hue color. It must be equal to or larger than the Chroma Clip angle. Inside the Chroma Ramp angle, the colors keyed out ramp linearly the closer the foreground color approaches the Chroma Clip angle. Outside the Chroma Ramp angle, the foreground colors are not suppressed.

  • Range:0 to 100
  • Default: 90

Opacity: This allows the key source to become increasingly transparent with respect to the background source.

  • Range: 0 to 100
  • Default: 100

Hue: This field selects the color to be removed or keyed out of the source. While this can be manually adjusted, the "PICK HUE" feature also changes this number.

  • Range: 0 to 100
  • Default: 0

Spill: Spill removes unwanted “key” color, which is generally a result of reflection from the (green or blue screen) background, on the foreground object.

  • Range: 0 to 100
  • Default: 0

Shadow: This allows shadows to be preserved or removed in the foreground image (opposite of Highlight).

  • Range: 0 to 100
  • Default: 0

Highlight: This allows highlights to be preserved or removed in the foreground image (opposite of Shadow).

  • Range: 0 to 100
  • Default: 0

Saturation Clip: This defines the threshold along the Saturation axis where keying begins.

Below the clip threshold, the colors are not keyed out. Above the clip threshold, the colors follow the results of Chroma Clip and Gain, but they depend on the Saturation Gain setting as this creates a linear key color strength ramp in the key area.

  • Range: 0 to 100
  • Default: 5

Saturation Gain: This defines the transition along the saturation axis between keying off and keying on.

  • Range: 0 to 100
  • Default: 5

Reset: Press to return all hue, clip, gain, and opacity settings to their default values.

Pick Hue

The Pick Hue button allows the user to pick and apply a selected hue from any single Layer.

  1. Click on the Pick Hue button.

    Clicking on the Pick Hue button for a Layer places a crosshair on the Layer in Preview in the Programming Diagram area.
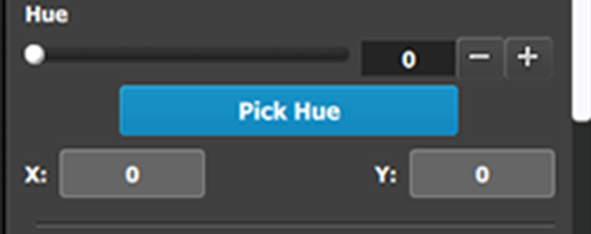
    Image 6–87 The Pick Hue button
  2. Click and drag the crosshair to the area above the desired hue.

    The user can move the crosshair using either the cursor or the X and Y edit boxes.
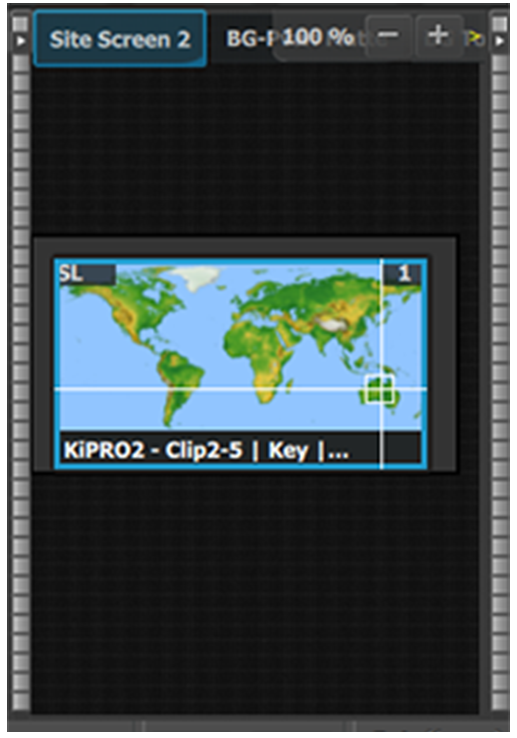
    Image 6–88 Crosshairs
  3. Complete the operation by clicking on the Apply Hue X/Y button, or cancel the operation by clicking on the Cancel Pick Hue button.
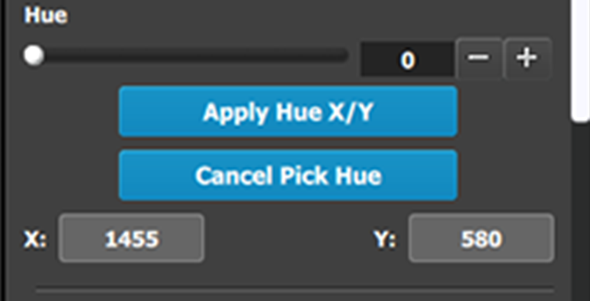
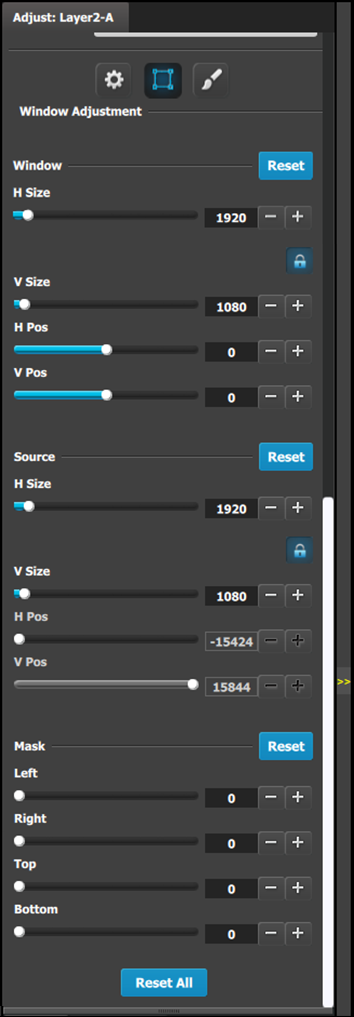
    Image 6–89 Apply Hue or Cancel
Layer adjustment panel > Layer Window adjustment

The following PIP Adjustment Menu functions are provided: (All figures are in pixels)

  • Window: Allows size and position adjustments of the window.

    • H Size — adjusts the PIP’s horizontal size.
    • V Size — adjusts the PIP’s vertical size.
    • H Position — indicates the PIP’s position, relative to the horizontal center of the screen (00), as measured from the exact center of the PIP. Thus, the value -34 is 34 pixels to the left of center.
    • V Position — indicates the PIP’s position, relative to the vertical center of the screen (00), as measured from the exact center of the PIP. Thus, the value 70 is 70 pixels above center.
  • Source: Allows size and position adjustments of the source within a window.

    • H Size — adjusts the source’s horizontal size.
    • V Size — adjusts the source’s vertical size.
    • H Position — indicates the source’s position, relative to the horizontal center of the screen (00), as measured from the exact center of the PIP. Thus, the value -34 is 34 pixels to the left of center.
    • V Position — indicates the source’s position, relative to the vertical center of the screen (00), as measured from the exact center of the PIP. Thus, the value 70 is 70 pixels above center.
  • Mask: The Mask Panel enables you to mask (crop) the top, bottom, left, and right edges of the PIP or key.
  • Reset All : Press to return all numbers to their default values.
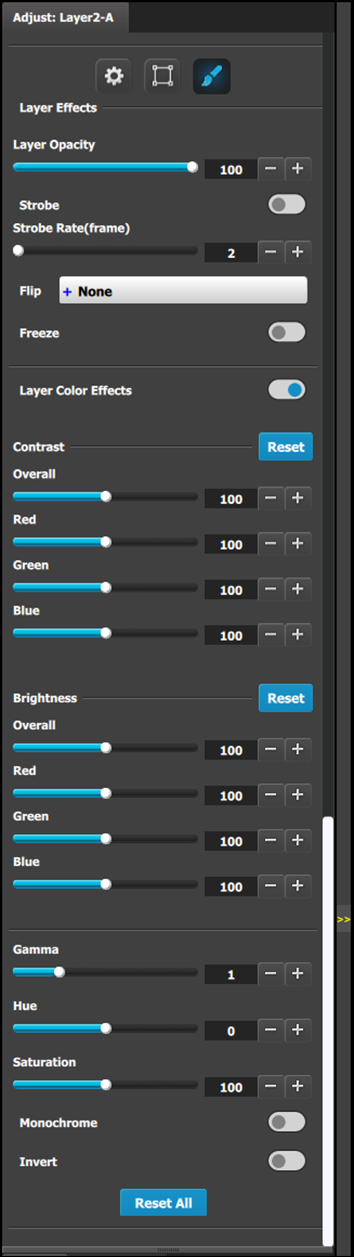
Layer adjustment panel > Layer Effects adjustment
  • Layer Opacity adjusts the level of opaqueness of the layer. The range is from 0 (100% transparent) to 100 (100% opaque) in 0.01 increments. The default setting is 100.
  • Strobe: Toggles the strobe function on and off. When On, adjust the strobe Rate interval (in frames) to set the duration that the source is frozen until the next grab.
  • Flip: Flips the image within the PIP:

    • Off: The image is displayed in its original orientation.
    • H: to flip the image horizontally, along the Y axis.
    • V: Flips the image vertically, along the X axis.
    • H/V: Flip the image both horizontally and vertically, along the X and Y axes.
  • Freeze: Enables or disables the freeze action.
  • RGB Contrast and Brightness settings are adjustable within a range of 0% to 200%. The default setting for all of these properties is 100%.
  • Gamma is adjustable within a range of 0.3 to 3.30. The default setting is 1.0.
  • Hue is adjustable within a range of -180 to +180 degrees. The default setting is 0 degrees.
  • Saturation is adjustable within a range of 0% to 200%. The default setting is 0%.
  • Monochrome: Toggle this button to turn the source video’s chroma component on and off. When off, the image is completely monochrome;
  • Invert: Toggle this button to turn the color “invert” function on and off. When on, all image colors are inverted.
  • Reset All: Returns all values to their default settings.

Note that almost all color correction effects (except “invert”) work on a keyframe by keyframe basis. This enables you to morph effects from keyframe to Keyframe.