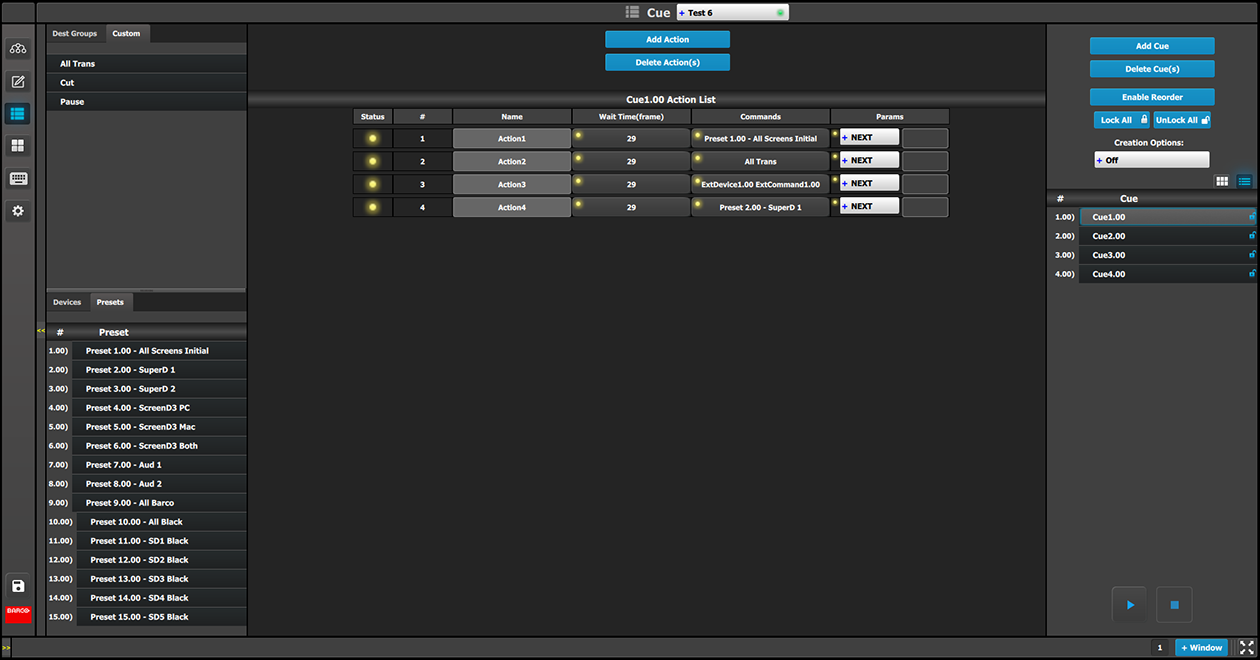
The Cue Workspace area is used to add actions to a Cue or to delete actions from a Cue.
Image 6–103Cue menu, Cue Workspace area
The Workspace area of the Cue menu provides:
An Add Action button to add actions to a Cue.
A Delete Action(s) button to delete one or more actions from a Cue.
A list of actions.
Each action in the action list has a column for Status, # (number), Name, Wait Time, Commands, and Params.
Status—The Status LED indicates the status of the status of the actions in a cue list.
Flashing Green means that the action is active, because the Cue is currently playing or paused.
Yellow means that the action is ready to play.
Gray (off) means that the action has finished.
# (Syntax number)—Actions can be added or deleted, but they cannot be re-ordered.
Name—Actions can be given meaningful names.
Wait Time—The wait time before an Action in a Cue takes place can be adjusted; the default wait time is half of the system’s native rate (in frames).
Commands—Commands can be selected from the tabs in the command resource area at the left side of the Workspace.
Params—Next, Pause, Delay, and Goto.
How to modify a Cue
Once a Cue has been selected from the adjustment area, a user can modify it by adding actions (up to a maximum of 12 actions per Cue) and adding a command to each action.
Note: A Cue cannot be modified while it is playing.
Note: The number of Cues in the Cue list can be up to 120, but the number of actions in a Cue can be only up to 12.
Select a Cue from the adjustment area.
Click on the Add Action button to add up to 12 actions to the Cue.
Drag and drop Dest Groups, Custom items (UI functions), Devices, or Presets to the Commands column of the Action List.
The wait time before an Action in a Cue starts a command defaults to half of the system’s native rate (29 Hz). The wait time can be adjusted.
Select the Param (parameter) for each Command.
Next (default)
When the action is finished, play the next action in the list.
Pause
“Pause” pauses the Cue at the end of the current action, before the following Action starts. The Operator must press “Play” to proceed to the next Action.
Delay
Enter the amount of time to delay (in frames) before the next Action is started. The time of the “Delay” parameter defaults to half of the system’s native rate (in frames). The Delay time can be adjusted.
Goto
Once “Goto” is selected, the system prompts the user to select another Cue and Action within the “Params” field to reference another Action in a different or same cue in order to effectively have the system automatically run multiple Cues or create a looping Cue.
How to play a Cue from the Cue Menu
To play a Cue from the Cue Menu, go to the adjustment area, select a Cue in the list, and click on the Play button.
How to play a Cue from the Programming Menu
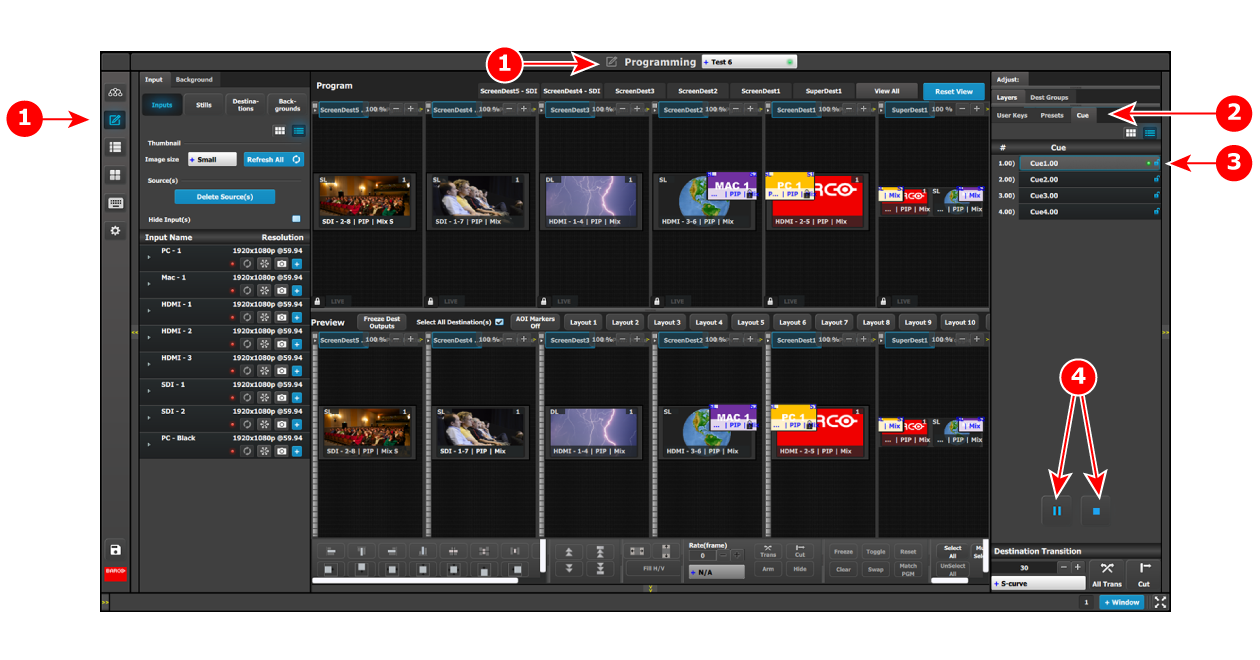
A Cue tab has been added to the Adjustment area of the Programming Menu. Once Cues have been created on the Cue Menu, you can Play, Pause, and Stop them from the adjustment area of the Programming Menu.
To play a Cue from the Programming Menu, go to the Cue tab in the adjustment area, select a Cue from the list, and click on the Play button.
Image 6–104Cue tab on the Programming Menu
1
Programming Menu icon (in the Menu navigation bar and in the title bar)
2
Cue tab in the adjustment area
3
Active cue on the cue tab of the adjustment area
A green LED indicates that the cue is active. An orange LED indicates that the cue is paused.