14.4 WiFi, Manual IP address setup

How to setup
  1. Click in the input field next to Address, select the actual address and enter a new address with your keyboard.
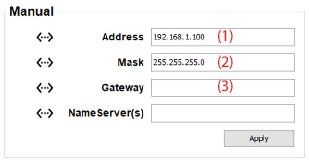
    Image 14–6
    Note: An address contains 4 octets with a maximum value of 255.

    Enter the 4 octets. This must NOT be 0.0.0.0 .

  2. Click in the Mask input field and fill out the 4 octets as appropriate for the local subnet.
  3. Click in the Gateway input field and fill out the 4 octets. Set the Default Gateway to the IP-Address of the router (MUST be on the local subnet!)

    Note: If there is no router on the projector's local subnet then just set this field to any IP-Address on the subnet.
  4. Click Apply to activate.
Tip: The PC's IP Address MUST be within the same subnet as the projector's IP Address in order for communication to be possible. This requires checking the PC's and projector's Subnet-Mask settings.
SSID setup
  1. Click on the drop down next to SSID and select the desired wireless network.

    Image 14–7
  2. Fill out User name and password when required.
  3. Click Connect to connect to the selected wireless network.