16.1 Laser Ranging

What can be done?

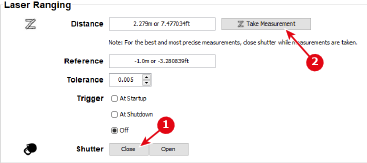
When the optional laser range finder is installed on the projector, you can use the laser source to measure the distance between the front of the projector and the surface you are projecting on. This can help you fine-tune the position of the projector.

You can now also store the measured distance as a reference value and verify the distance at certain time intervals (e.g. during startup). This way, you will be notified if the projector has been moved from its original reference position.

Note: Take into account that while a laser ranging session is active, the projected image will be off. This to have no interference between laser pointer and projected image.

Instead, a red border will be projected giving the outline of where the projected image should be.

Tip: For the best and most precise measurements, close shutter while measurements are taken.
How to use
  1. Close the shutter for a better measurement. Click on Close next to Shutter.

    Image 16–1 Example of the Laser Ranging pane
  2. Click Take Measurement to measure the distance.

    The measured distance will be displayed next to Distance as well in meter as in feet.

    Underneath that, you will see the difference in distance between measurement and the last stored reference value.

  3. Open shutter again. Click Open.
How to verify the measured distance?

Once a measured reference distance has been stored in the projector, you can verify the currently measured distance with the stored reference distance as follows: