About the settings
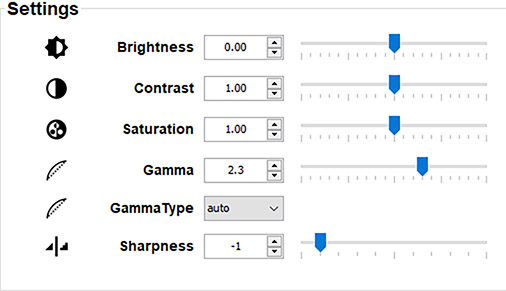
Brightness: Change the brightness of the complete output signal (main and PiP window together) of the projected image. The brightness function is used to adjust the black level in the input picture. It adds or subtracts an offset, or bias in to the red, green and blue signals. Value between -1.00 and 1.00 with a default of 0.00 .
Contrast: Change the contrast of the complete output signal (main and PiP window together) of the projected image. Used to adjust the contrast ratio of the displayed image by applying gain to the red, green and blue signals. Value between 0.00 and 2.00 with a default of 1.00 .
Saturation: Change the saturation of the complete output signal (main and PiP window together) of the projected image. Saturation levels impact on the white levels and the intensity of the color display; the higher the value, the more vivid the color display will be. Value between -1.00 and 2.00 with a default of 1.00 .
Sharpness: adjustment amplifies the high frequency components in the picture, meaning that by increase the sharpness, the picture will be perceived as sharper, and if decreased, the picture will be perceived as more blurry. Increasing the sharpness will have the best effect in high contrast images, eg a table with text and borders. In a natural picture, high sharpness can be perceived as noise, as all details in the picture will be amplified. Value between -2 and 8 with a default of 0.
Gamma: image quality enhancement that offers a richer image by brightening the already darker portions of the image without altering the brightness of the brighter portions. Value between 1.0 and 2.8 with a default of 2.2 .
Gamma type: Select one of the predefined presets to simulate gamma types for other devices or purposes. his includes auto (default value), sRGB (standard Red-Green-Blue), Power gamma, and a number of DICOM gamma ranges (varying per projector type).