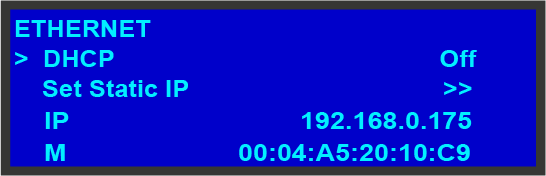
The Ethernet submenu allows the user to view and change certain Ethernet settings.
Image 5–17
Using this menu, you can:
Query the DHCP server for a valid IP address, or turn off this feature.
Set a static IP address for the Event Master unit, along with a subnet mask and gateway. This feature is available only if DHCP is turned Off.
View the unit’s IP address.
If there is no internet connection, or if a DHCP server has not been found, the IP address is 000.000.000.000. In this case, the system ignores the Ethernet port.
View the Media Access Control (MAC) address of the unit’s Ethernet port.
Query the DHCP server
In the Ethernet submenu, the default setting for DHCP is On. When DHCP is turned on, the system automatically queries the DHCP server for a valid IP address. If the unit receives an IP address, that address is displayed in the Ethernet submenu.
Note: It can take several seconds to obtain an address from the server. During this time, the SEL button remains lit.
When DHCP is off, you can manually enter a static IP address, along with a subnet mask and gateway, in the Set Static IP submenu. Consult your network administrator for a valid IP address, subnet mask and gateway.
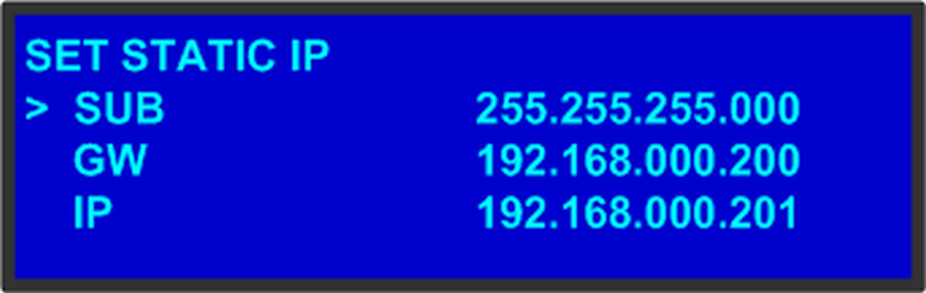
Setting a static IP Address
When a DHCP server is not available, you can set the Event Master unit’s IP address, using the Set IP submenu shown in the following illustration.
Image 5–18Set IP Submenu (sample)
How to set a static IP address?
Ensure that the DHCP setting is Off.
From your network administrator, obtain a valid IP address, including subnet and gateway.
On the Ethernet submenu, select Set Static IP.
On the Set IP submenu, select SUB(net). The last character in the first field becomes available, as indicated by the empty field and an underscore.
Note: You must change the SUB parameter before editing either of the other parameters.
Turn the ADJUST knob to change the first value. As you continue turning the knob, you can change all three values in this field. Values range from 000 to 255 in all four fields.
Press SEL to accept your change in the first field. The last character in the next field becomes available.
Continue until you have created the subnet value you want. Press SEL.
Make similar changes in the GW and IP fields.
Press SEL to accept your final change.
Note: If you press ESC at any time before accepting your final change, all your edits will be removed, and the original values restored.