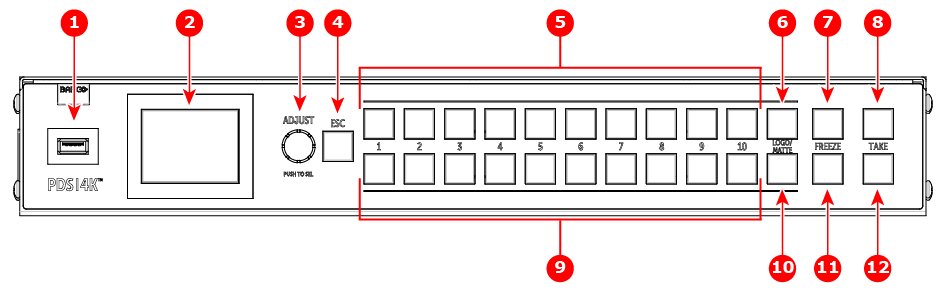
See Image 3–1 for an illustration of the PDS-4K front panel.
Image 3–1Front panel
1
USB port
2
Display screen
3
Adjust knob
4
ESC (Escape) button
5
Source buttons, top row
6
Logo / Matte button, top row
7
Freeze button, top row
8
Take button, top row
9
Source buttons, bottom row
10
Logo / Matte button, bottom row
11
Freeze button, bottom row
12
Take button, bottom row
The front-panel controls can be used in each of the following modes:
Full Screen mode
PVW/PGM mode
Preset/Cue mode
General functions
The USB port, the display screen, the adjust knob, and the ESC button have the same functions in all three modes.
USB port
Use the USB port to import and export PNG images or to perform Backup/Restore operations and firmware upgrades.
Display screen
The LCD color video display shows all PDS-4K menus, sub-menus, and messages.
Adjust knob
Turn the Adjust knob to scroll up or down through the menus.
Turn the knob clockwise to scroll down.
Turn the knob counter-clockwise to scroll up.
Press the Adjust knob to select menu items.
ESC (Escape) button
Press the ESC button to exit a menu without making changes, to cancel an operation, to answer "No" to menu queries, or to return to the Status Menu. Each press takes you back up the menu tree one level.
Full Screen mode
In Full Screen mode, the top row and bottom row each control a separate screen or group of screens. When “Auto Take” is off, selecting a source places that source in PVW for the assigned output. When “Auto Take” is on, selecting a source transitions that source immediately to PGM for the assigned output. Full Screen mode is the default operational mode for the front panel.
The following are descriptions of the front-panel control features in Full Screen mode.
Source buttons, top/bottom row
Use these buttons to select sources for the output that is assigned to the row of buttons.
Each button places a source in PVW when “Auto Take” is turned off.
Each button transitions a source to PGM when “Auto Take is turned on.
Logo / Matte button, top and bottom row
Use this button to select the Logo or Matte color for the output that is assigned to the source buttons in the top/bottom row.
This button places a Logo/Matte in PVW when “Auto Take” is turned off.
This button transitions a Logo/Matte to PGM when “Auto Take is turned on.
Freeze button, top and bottom row
Operates based upon the user setting in the System> Operation Setup> Front Panel Setup> Freeze Menu.
PGM: Freezes the active source on PGM for the output assigned to top or bottom row.
PVW: Freezes the active source that is in PVW and awaits the operator to transition the frozen source to PGM.
Off: Disables the Freeze buttons.
To thaw a frozen image on PGM, press the same source button and transition it to PGM.
Take button, top and bottom row
Use this button to transition the source in PVW to PGM for the output assigned in the top/bottom row.
Set the duration of the transition in the Output Menu/Trans Time.
When “Auto Take” is turned on, this button is disabled, but it still indicates that a transition is taking place by shifting from dim red to bright amber during the transition.
Preset/Cue mode
The following are descriptions of the front-panel control features in Preset/Cue mode.
Source buttons (1–10), top and bottom row
Map the top-row and bottom-row source buttons to presets or cues.
Each button either recalls a preset or selects a cue when “Auto Take” is turned off.
Press the top-row Take button to either transition the preset to PGM or start the cue.
Each button immediately either recalls a preset and transitions or starts a cue when "Auto Take" is turned on.
The top-row Take button pauses or resumes a running cue, as does the Play/Pause button on an EC-210 controller.
The bottom-row Take button stops a running cue, as does the Stop button on an EC controller.
The current recalled preset or selected cue is indicated by a bright white button (presets) or a bright cyan button (cues). After a preset has transitioned to PGM or a cue has stopped, the button returns to dim white or cyan.
Logo / Matte button, top and bottom row
Press the top-row Logo / Matte button to take a Logo or Matte color directly to PGM for all outputs.
Press the bottom-row Logo / Matte button to place a Logo or Matte color into PVW for all outputs, then press the top-row Take button to transition the Logo or Matte color to PGM for all outputs.
Freeze button, top and bottom row
The Freeze buttons act as global freeze buttons, affecting all PGM outputs.
Top-row and bottom-row Freeze buttons have the same function; they freeze or thaw all layers on PGM.
Take button, top row
When a preset or cue is recalled/pending the top-row Take button is lit bright amber to indicate it should be pressed to transition the preset to PGM or start the cue.
Press the top-row Take button to transition the preset to PGM or start the cue.
The button is dim amber until the preset has finished transitioning, or the cue has ended at which time the button's light will be off.
Press the top-row Take button while a cue is playing to pause the cue, just like the Play/Pause button on EC-210.
When a cue is paused the button is lit bright amber.
Press the top-row Take button while the cue is paused to resume the cue.
When a cue is resumed the button is lit dim amber.
Take button, bottom row
Use the bottom-row Take button to Stop a cue, just like the Stop button on an EC controller.
While a cue is running the button is lit dim amber.
After the button is pressed to stop a cue, the button light is turned off, and the source button for the cue returns to dim cyan.