Preparations
Adjust the boresight screws by turning the boresight extenders clockwise or counter-clockwise. Once a lens is installed, the adjustment ranges for the boresight screws are limited.

Adjust the boresight screws by turning the boresight extenders clockwise or counter-clockwise. Once a lens is installed, the adjustment ranges for the boresight screws are limited.
Adjust the LSM small gears according below tables and figures.
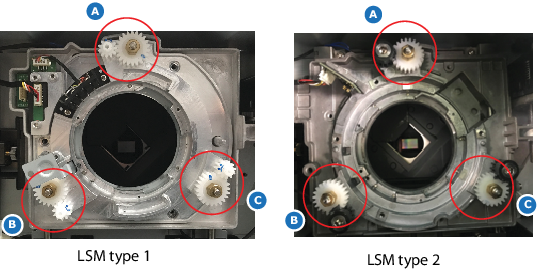
| Adjustment ranges (in turns) for the boresight screws for G60 + LSM type 1 | |||
| Orientation | A | B | C |
| Table top | 3 + 1/4 | 7 + 3/4 | 8 + 3/4 |
| Portrait (L) | 6 + 2/4 | 3 + 3/4 | 8 + 2/4 |
| Portrait (R) | 6 + 3/4 | 8 + 3/4 | 4 + 2/4 |
| Ceiling mount | 8 + 2/4 | 5 + 1/4 | 5 + 3/4 |
| Upright | 8 | 7 + 3/4 | 8 |
| Adjustment ranges (in turns) for the boresight screws for G60 + LSM type 2 | |||
| Orientation | A | B | C |
| Table top | 7 | 7 | 7 |
| Portrait (L) | 8 + 1/2 | 8 + 1/2 | 5 + 1/4 |
| Portrait (R) | 8 + 1/2 | 5 + 1/2 | 8 + 1/2 |
| Ceiling mount | 11 | 5 + 1/2 | 6 + 1/2 |
| Upright | 9 + 1/2 | 7 | 7 |
| Adjustment ranges (in turns) for the boresight screws for G62 + LSM type 2 | |||
| Orientation | A | B | C |
| Table top | 3 | 3 | 3 |
| Portrait (L) | 5+ 1/4 | 5 + 1/4 | 2 |
| Portrait (R) | 5 | 2 | 5 |
| Ceiling mount | 7 + 1/2 | 2 | 3 |
| Upright | 5+ 1/2 | 3 | 3 |
