8.10.8.2 Creating inputs

Location
  1. Navigation side bar: Configuration
  2. Central work window: Detail View
  3. Right panel: Input
How to create
  1. Must all available inputs be created?
    • If no, go to next step.
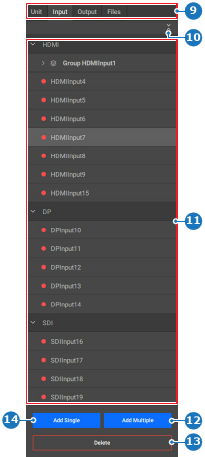
    • If yes, click Add Multiple (reference 12) and go to step 4.
    Image 8–61
    9
    Category selection
    10
    Collapse or expand all inputs
    11
    Input list per type
    12
    Create multiple inputs button
    13
    Delete selected input button
    14
    Create single input button

    The created inputs are added in the input list (reference 11, Image 8–61) categorised under connector type.

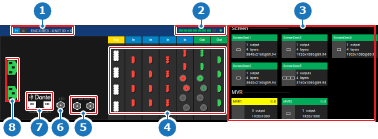
  2. Select the desired inputs in the card layout (reference 4) of the central work window.

    Tip: Clicking a connector selects that connector, clicking the connector a second time deselects it.
    Image 8–62
    1
    Unit details
    2
    Screen resource indicator
    3
    Used/available resource mapping overview
    4
    Event Master card connector status
    5
    Genlock connection status
    6
    LTC connection status (not yet supported)
    7
    Dante audio connection status (not yet supported)
    8
    Power connection status
  3. Which of the following selections was made?

    • In case of one connector, click Add Single (reference 14, Image 8–61) or Add Multiple (reference 12, Image 8–61).
    • In case of multiple connectors of the same type that must be grouped, click Add Single (reference 14, Image 8–61).
    • In case of multiple connectors of the same type that must be separate, click Add Multiple (reference 12, Image 8–61).
    • In case of multiple connectors of a different type, click Add Multiple (reference 12, Image 8–61).

    The created inputs are added in the input list (reference 11, Image 8–61) categorised under connector type.

  4. Click the save icon () in the header.