8.10.6.4 Genlock

genlock
Genlock syncs the first frame of each output and locks the frames to the same clock speed. This ensures that all signals are updated together.
Location
  1. Navigation side bar: Configuration
  2. Central work window: Detail View or System View or Link Resources
Genlock out

A valid genlock out signal is always actively being sent on the out port, regardless of connections. This signal is tied to the system native rate. Different system native rates are valid depending on the chosen reference output resolution:

About freerun

When Freerun is active, then any incoming genlock signal will be ignored by the system.

How to lock to external
  1. Is the bottom panel hidden?

    • If yes, click the burger menu (). Go to next step.
    • If no, go to next step.
  2. Is the system native rate half, the same or double that of the incoming signal?
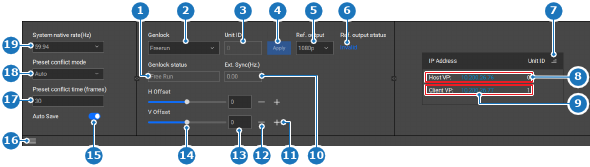
    • If yes, go to next step.
    • If no, select the desired genlock rate from the System native rate(Hz) drop down (reference 19) and go to next step.
    Image 8–32
    1
    Current Genlock mode label
    2
    Genlock mode drop down
    3
    ID of the genlock enabled unit
    4
    Apply genlock settings button
    5
    Genlock reference output drop down
    6
    Current status of the genlock reference output
    7
    Unit ID sorting button
    8
    Host unit details
    9
    Client unit details
    10
    External genlock sync status label
    11
    Increase offset button
    12
    Decrease offset button
    13
    Offset input field
    14
    Offset slider
    15
    Auto save toggle
    16
    Show or hide the bottom panel
    17
    Preset conflict frames input field
    18
    Preset conflict mode drop down
    19
    System native rate drop down
  3. Select Lock to External from the Genlock drop down (reference 2, Image 8–32).

    The text after Genlock status (reference 1, Image 8–32) changes to ‘locked’.

  4. Adjust the offset using one of the following methods:

    • Using the slider (reference 14, Image 8–32): drag the white ball over the slider until the desired amount is reached.
    • Entering a value (reference 13, Image 8–32): enter any desired value between ‘-100’ and ‘100’ in the input field.
    • Using the + and - buttons: click on the + (reference 11, Image 8–32) to increase the value with one point and on the - (reference 12, Image 8–32) to decrease the value with one point.
  5. Click the save icon () in the header.