8.10.9 MVR configuration

Location
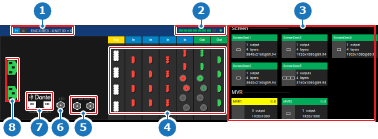
  1. Navigation side bar: Configuration
  2. Central work window: Detail View
  3. Right panel: Output > MVR
About MVR

MVRs are automatically created by the unit. These MVRs cannot be deleted. It is also not possible to create additional MVRs.

When an MVR is assigned directly to an output, then the entire MVR layout is streamed on that output without the need for additional configurations. For more information on how to manage the MVR layouts, see “MVR”.

How to configure
  1. Is there more than one unit in the system?
    • If yes, select the desired unit from the radio buttons (reference 11 or 18) in the right panel.
    • If no, go to next step.
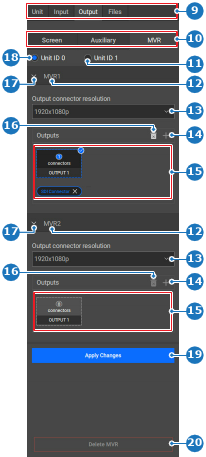
    Image 8–69
    9
    Category selection
    10
    Output selection
    11
    Unit ID 1 radio button
    12
    MVR name input field
    13
    Output connector resolution drop down
    14
    Create additional output button
    15
    MVR destination output overview
    16
    Delete selected output button
    17
    Collapse section button
    18
    Unit ID 0 radio button
    19
    Apply button
    20
    Delete button
  2. Double click on the name (reference 12, Image 8–69) of the desired MVR to rename.

    Tip: Provide clear names that reflect the intended purpose.
  3. Select the desired resolution from the drop down under Output connector resolution (reference 13, Image 8–69).
  4. Click on the output field in the Outputs section (reference 15, Image 8–69) to assign the MVR to the output.
  5. Click on the desired connector (reference 4) in the central work window to map the output.

    Note: Only output connectors from the same unit can be selected.
    Image 8–70
    1
    Unit details
    2
    Screen resource indicator
    3
    Used/available resource mapping overview
    4
    Event Master card connector status
    5
    Genlock connection status
    6
    LTC connection status (not yet supported)
    7
    Dante audio connection status (not yet supported)
    8
    Power connection status

    The name of the connector is added below the output field.

  6. Must advanced settings of the MVR be modified?

    • If yes, click on the name (reference 12, Image 8–69) of the desired MVR in the right panel. Go to next step.
    • If no, go to step 8.

    A pop-up is shown in the central work area.

  7. Edit any desired settings in the pop-up window.
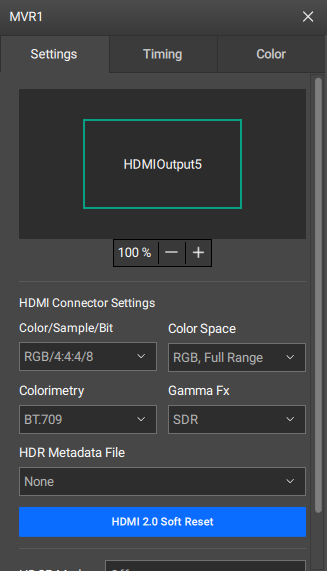
    Note: Some settings require advanced knowledge. Ensure enough training and understanding of the setting before editing.
    Tip: This pop-up window can be moved anywhere within the central work area.
    Image 8–71
  8. Click the save icon () in the header.