8.3 Event Master Toolset installation

Note: The Encore3 requires Event Master Toolset 10 or higher. Any lower version will not be able to detect the Encore3.
About the installation

The following instructions use a Windows 10 installation as example. The installer flow is the same for every supported operating system.

How to install
  1. Download and run the Event Master Toolset package of the desired OS. For more information on the available packages, see the Barco website https://www.barco.com/en/support.

    • Windows
    • Mac

    The language page is shown.

  2. Select the desired language from the drop down (reference 1).
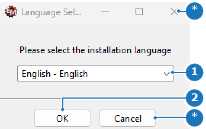
    Image 8–3
    1
    Language drop down
    2
    Next step button
    *
    Close button
  3. Click OK (reference 2, Image 8–3) to continue.

    The setup page is shown.

  4. Read the displayed notice (reference 3).
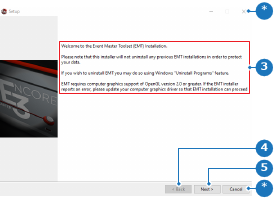
    Image 8–4
    3
    Installation notice
    4
    Previous step button (disabled)
    5
    Next step button
    *
    Close button
  5. Click Next (reference 5, Image 8–4) to continue.

    The license page is shown.

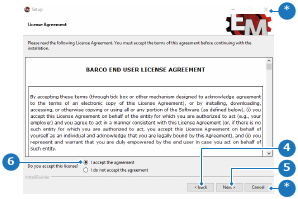
  6. Read the Barco end user license agreement.
  7. Click on the radio button before I accept the agreement (reference 6) to accept the license agreements.

    Tip: It is not possible to use the Event Master Toolset software without accepting the license agreement.
    Image 8–5
    4
    Previous step button
    5
    Next step button
    6
    Accept agreement button
    *
    Close button
  8. Click Next (reference 5, Image 8–5) to continue.

    The install location page is shown.

  9. Must the install location be changed?

    • If no, go to next step.
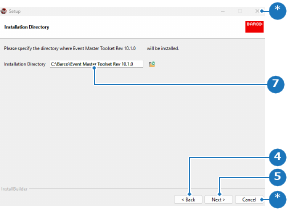
    • If yes, enter the desired path in the input field (reference 7) or navigate to the desired folder using the folder icon (). Go to next step.
    Image 8–6
    4
    Previous step button
    5
    Next step button
    7
    Installation path input field
    *
    Close button
  10. Click Next (reference 5, Image 8–6) to continue.

    The Event Master Toolset software is installed with the desired settings. This may take a while.

  11. Must the Readme file be shown?

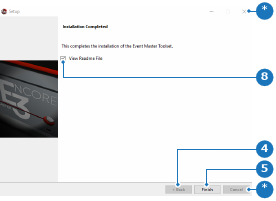
    • If yes, check the check box in front of View Readme File (reference 8). Go to next step. (recommended)
    • If no, uncheck the check box in front of View Readme File (reference 8). Go to next step.
    Image 8–7
    4
    Previous step button (disabled)
    5
    Next step button
    8
    Readme file check box
    *
    Close button (disabled)
  12. Click Finish (reference 5, Image 8–7) to complete the installation.