8.10.7.5 Editing screen destinations

Location
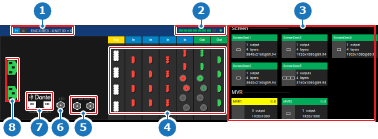
  1. Navigation side bar: Configuration
  2. Central work window: Detail View
  3. Right panel: Output > Screen or Auxiliary
How to edit
  1. Select the desired destination using one of the following methods:

    • Click on the desired destination in the mapped (reference 3) section in the central work window.
    • Click on the desired output connector (reference 4) in the central work window.
    • Select the desired destinations from the right panel under Screen (reference 28) or Aux (reference 39).
    Note: Only one option can be selected at a time.
    Tip: Selections from one method are automatically reflected in the other methods as well.
    Image 8–57
    1
    Unit details
    2
    Screen resource indicator
    3
    Used/available resource mapping overview
    4
    Event Master card connector status
    5
    Genlock connection status
    6
    LTC connection status (not yet supported)
    7
    Dante audio connection status (not yet supported)
    8
    Power connection status
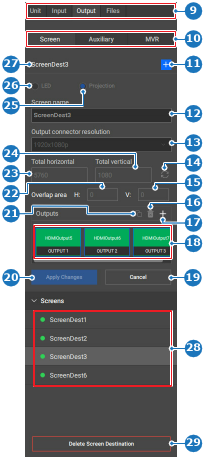
    Image 8–58
    9
    Category selection
    10
    Output selection
    11
    New screen destination button
    12
    Screen destination name input field
    13
    Output connector resolution drop down
    14
    Refresh horizontal and vertical pixels button
    15
    Vertical projection blend area
    16
    Delete selected output button
    17
    Create additional output button
    18
    Screen destination output overview
    19
    Cancel button
    20
    Confirmation button
    21
    Copy output button
    22
    Horizontal projection blend area
    23
    Screen destination horizontal pixels input field
    24
    Screen destination vertical pixels input field
    25
    Projector screen destination type
    26
    LED screen destination type
    27
    Current selection name
    28
    Screen destination list
    29
    Delete screen destination button
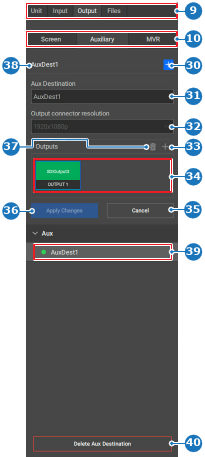
    Image 8–59
    9
    Category selection
    10
    Output selection
    30
    New aux destination button
    31
    Aux destination name input field
    32
    Output connector resolution drop down
    33
    Create additional output button
    34
    Aux destination output overview
    35
    Cancel button
    36
    Confirmation button
    37
    Delete selected output button
    38
    Current selection name
    39
    Aux destination list
    40
    Delete aux destination button

    A detail window pops-up in the central work area.

  2. Edit any desired settings in the pop-up window.
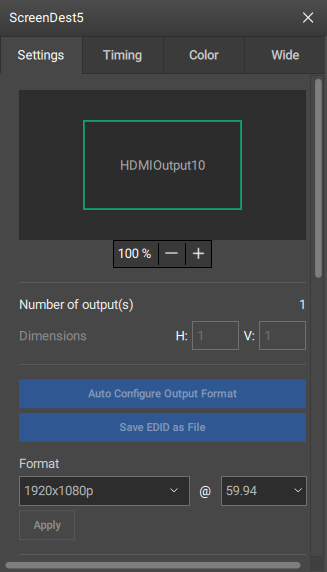
    Note: Some settings require advanced knowledge. Ensure enough training and understanding of the setting before editing.
    Tip: This pop-up window can be moved anywhere within the central work area.
    Tip: If there are enough screen destination resources available, then the amount of mix layers can be increased. For more information, see “Resources”.
    Image 8–60
  3. Click the save icon () in the header.