8.12.1.1 Creating a layout

Location
  1. Navigation side bar: Programming
  2. Bottom panel: Layout row
How to create
  1. Can an existing layout be used as a start point?

    • If yes, select Duplicate layout from the layout options menu () after the name of the desired layout (reference 3) in the bottom panel.
    • If no, click the plus icon () in the Layout row (reference 1) of the bottom panel.
    Image 8–87
    1
    New layout button
    2
    Layout name input field
    3
    Layout options menu
  2. Drag and drop one desired destination from the top panel (reference ) to the central work area (reference ) as illustrated.

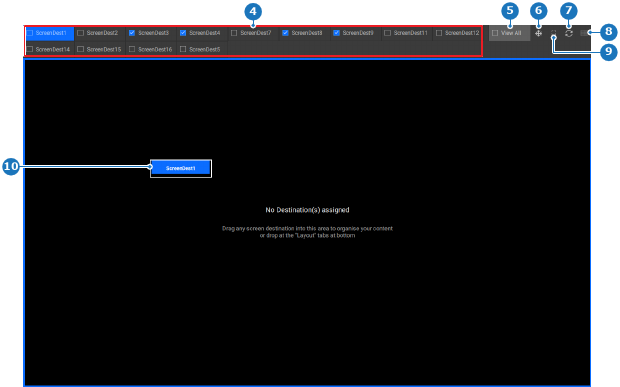
    Note: The check box of the destination is not part of the menu that can be dragged.
    Note: The View All cannot be dragged into the central work area.
    Image 8–88
    4
    Destination list
    5
    View all destinations
    6
    Freeze destination output button
    7
    Reset destination size button
    8
    Destination display button
    9
    Show or hide area of interest markers button
    10
    Selected destination to add to the layout
  3. Drag and drop the other desired destinations in the layout one by one, by using the following methods:
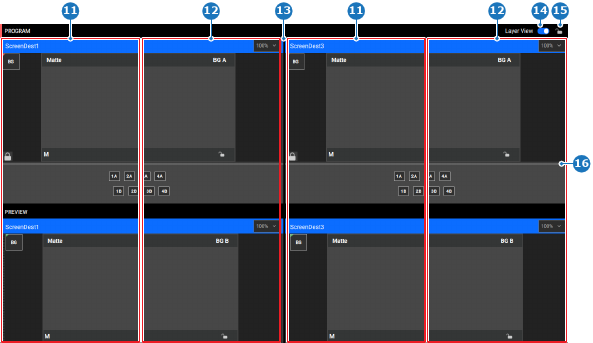
    • Drop the destination on the layout entry in the bottom panel (reference 2, Image 8–87) to append the destination on the right.
    • Drop the destination on the left side of the central work area (reference 11) to append the destination on the left.
    • Drop the destination on the right side of the central work area (reference 12) to append the destination on the right.
    • Drop the destination in between two other destinations in the central work area to put the destination between the two other destinations.
    Note: A maximum of three destinations can be added per layout.
    Image 8–89
    11
    Drop area left append
    12
    Drop area right append
    13
    Vertical resize
    14
    Toggle layer view
    15
    Lock program layers
    16
    Horizontal resize
  4. Adjust the size of each destination by clicking and dragging the line in between two destinations (reference 13, Image 8–89). (optional)

    Note: To go back to the default size, click the reset icon () in the top panel.
  5. Adjust the size of each preview or program by clicking and dragging the line in between the PROGRAM section and the PREVIEW section (reference 16, Image 8–89). (optional)

    Note: To go back to the default size, click the reset icon () in the top panel.
  6. Double click on the name (reference 2, Image 8–87) to enter a name for the layout.

    Tip: Provide clear names that reflect the intended purpose.
  7. Click the save icon () in the header.
