8.4 The simulator

Terminal
The terminal is a command line interface that allows for direct communication between an application and the operating system. This is required to run automated scripts or commands. It is possible to follow along with what the application is doing. The information displayed can be used to identify possible problems or use as a temporary logging.
About the simulator

The simulator allows users to virtually “connect” to any Encore3 configuration. These virtual units will act like a real physical unit connected to the software. Allowing for trials of the software, creating ShowFile files, testing configurations and giving demos.

These virtual Encore3 units run using a terminal window. Closing this terminal window will force the simulator to shut down.

How to configure
  1. Navigate to the simulator using one of the follow categories from the navigation side bar:

    • For the Simulator () category, go to next step.
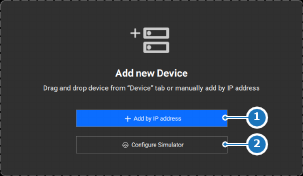
    • For the Configuration () category, click on Configure Simulator (reference 2) in the central work area. Go to next step.
    Image 8–8
    1
    Manual IP address connection
    2
    Simulator configuration link

    The Simulator () category is shown.

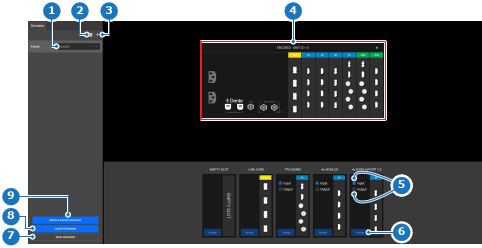
  2. Is the configuration in the central work area (reference 4) as desired?

    • If yes, go to step 8.
    • If no, go to next step.
    Image 8–9
    1
    Frame type drop down
    2
    Remove selected frame
    3
    Add a frame
    4
    Current simulator configuration
    5
    Event Master card type radio buttons
    6
    Event Master card or empty slot assign button
    7
    Simulator stop button
    8
    Launch the simulator button
    9
    Reset and launch the simulator button
  3. Are the amount of frames as desired?

    Tip: If the left panel is not visible, click the arrow () at the left of the header.
    • If yes, go to next step.
    • If no and there are not enough frames, click the plus icon (). Go to next step.
    • If no and there are too many frames, select the unwanted frame and click the trash icon (). Go to next step.
  4. Is the Event Master card configuration of the frames as desired?

    Note: At least one input card and one output card are required to run the simulator.
    • If yes, go to step 8.
    • If no and a default configuration is desired, select the configuration from the drop down after each desired frame (reference 1, Image 8–9). Go to step 8.
    • If no and a custom Event Master card layout is desired, go to next step.
  5. Select the mode of the desired Event Master card using the radio buttons (reference 5, Image 8–9).
  6. Assign or overwrite the Event Master cards using one of the following methods:

    Tip: If a slot does not support the Event Master card that is being assigned, then the current assigned Event Master card will not be overwritten.
    • For single assignment, drag the desired card from the bottom panel and drop it on the desired slot.
    • For single or multiple assignment, select the desired slots and click on the Assign button (reference 6, Image 8–9) of the desired card.
  7. Is the card configuration of the frames as desired?

    • If yes, go to next step.
    • If no, repeat from step 5.
  8. Must any changes from the previous simulator be loaded?

    • If yes, click on Launch Simulator (reference 8, Image 8–9) to keep the changes.
    • If no, click Reset & Launch Simulator (reference 9, Image 8–9).

    A terminal is opened in the background.

  9. Start using the Event Master Toolset as usual. For more information, see the following chapters.

    From here on the manual will refer to the simulated system is a real system