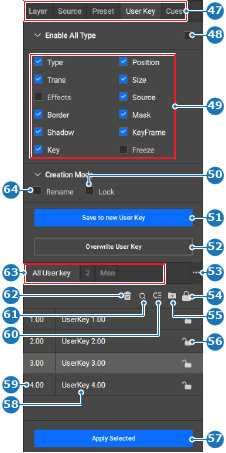
8.12.11 User keys

Location
  1. Navigation side bar: Programming
  2. Central work area: PREVIEW or PROGRAM
  3. Right panel: User Key
About user keys

User keys save desired changes of layers. These changes can then be applied to other layers where a similar effect or change is needed without affecting other settings of the layer.

Prerequisites

The layer must be modified with the desired changes. For more information, see the relevant topics in “Scene creation”.

How to create
  1. Select the desired layer in the scene.
  2. Decide which settings must be included.

    • If all options must be included, enable the check box in front of Enable All Type (reference 48).
    • For each option that must be included, check the check box in front of the settings name (reference 49).
    • For each option that must be excluded, uncheck the check box in front of the settings name (reference 49).
    Tip: If the options are hidden, then click the arrow ().
    Image 8–131
    47
    Category selection
    48
    All user key types toggle button
    49
    User key type options
    50
    Lock new user key toggle button
    51
    Save user key button
    52
    Overwrite selected user key button
    53
    User key folder menu
    54
    Lock or unlock all user keys button
    55
    Move selection to folder
    56
    Lock or unlock user key
    57
    Apply selected user key
    58
    User key name input field
    59
    User key ID input field
    60
    Reorganise user key button
    61
    Search user key button
    62
    Delete selected user key button
    63
    User key folders
    64
    Rename new user key toggle button
  3. Decide how the user key must be created in Creation Mode. (optional)

    • Check the check box in front of Rename (reference 64, Image 8–131) if the created user key will be named immediately.
    • Check the check box in front of Lock (reference 50, Image 8–131) if the user key must be locked for editing.
  4. Must an existing user key be overwritten?

    • If yes and the user key is unlocked (), select the user key and click Overwrite User Key (reference 52, Image 8–131).
    • If no, click Save to new User Key (reference 51, Image 8–131).
  5. Was the option Rename (reference 64, Image 8–131) selected?

    • If yes, enter a name (reference 58, Image 8–131).
    • If no and the user key is unlocked (), double click on the name (reference 58, Image 8–131) and enter a name.
    Tip: Provide clear names that reflect the intended purpose.
  6. Double click on the ID in front of the user key (reference 59, Image 8–131) and enter a desired ID. (optional)

    Note: Numbers must be unique.
    Tip: Up to two decimal numbers are allowed.
    Tip: The automatic numbering will ignore decimal numbers and add one to the highest whole number in the list.
    Tip: The number decides at which position it is located in the list.
  7. Click the save icon () in the header.