8.14.2 Tally assignment

Location
  1. Navigation side bar: Tally
  2. Right panel: Tally
About tally assignment

Each input can be assigned to a tally. This tally can have different functionality for each possible destination. The following functionalities are possible:

How to assign
  1. Select the desired input for each tally in the drop down of column Resources (reference 17, Image 8–151).

    Tip: Selecting None as input will disable the tally protocol for that tally number.
  2. Set the desired functionality using one or multiple of the following methods:
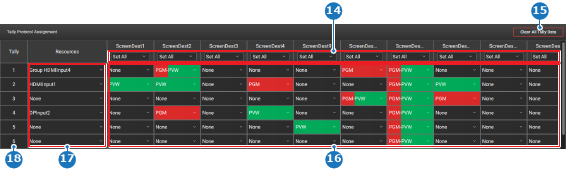
    • Single assignment, select the desired functionality from the drop down menu in the configuration grid (reference 16, Image 8–151). Go to step 7.
    • Bulk destination assignment, select the desired functionality from the bulk destination assignment drop down (reference 14, Image 8–151). Go to step 7.
    • Bulk tally assignment, go to next step.
    Tip: To remove the tally configuration, click Clear All Tally Data (reference 15).
    Image 8–151
    14
    Bulk destination assignment drop down
    15
    Clear tally configuration button
    16
    Tally configuration grid
    17
    Resource drop down
    18
    Tally number
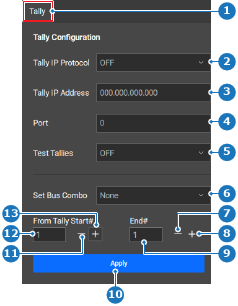
  3. Select the desired functionality from Set bus combo (reference 6) in the right panel.

    Image 8–152
    1
    Category selection
    2
    Tally protocol drop down
    3
    Tally hub IP address input field
    4
    Tally hub port input field
    5
    Test tally drop down
    6
    Bus combo drop down
    7
    Decrease end tally number
    8
    Increase end tally number
    9
    End tally number input field
    10
    Apply button
    11
    Decrease tally start number
    12
    Tally start number input field
    13
    Increase start tally number
  4. Set the start tally value after From Tally Start# using one of the following methods:

    • Entering a value (reference 12, Image 8–152): enter any desired value between ‘1’ and ‘64’ in the input field.
    • Using the + and - buttons: click on the + (reference 13, Image 8–152) to increase the value with one point and on the - (reference 11, Image 8–152) to decrease the value with one point.
  5. Set the start tally value after End# using one of the following methods:

    • Entering a value (reference 9, Image 8–152): enter any desired value between ‘1’ and ‘64’ in the input field.
    • Using the + and - buttons: click on the + (reference 8, Image 8–152) to increase the value with one point and on the - (reference 7, Image 8–152) to decrease the value with one point.
  6. Click Apply (reference 10, Image 8–152).

    All entries in each row of the range get the selected functionality.

  7. Test the tally configuration. (optional)

    1. Select All ON from the drop down after Test Tallies (reference 5, Image 8–152).

      The light on each assigned tally resource turns on.

    2. Verify the tally lights are working as intended.
    3. Select OFF from the drop down after Test Tallies (reference 5, Image 8–152).
  8. Click the save icon () in the header.