8.12.8 Adding backup input

Location
  1. Navigation side bar: Programming
  2. Left panel: All Sources
About backup input

Inputs can lose connection or go offline during an event. When this happens, Event Master Toolset can switch the input to a backup input. This ensures that an image is restored as soon as possible. When the original input is back online, then the Event Master Toolset will show a green dot () before the name. The user can then decide whether the input must go back to the original input.

How to set
  1. Is the Source List toggle button (reference 8) enabled?

    • If yes, disable the Source List toggle button (reference 8) and go to next step.
    • If no, go to next step.
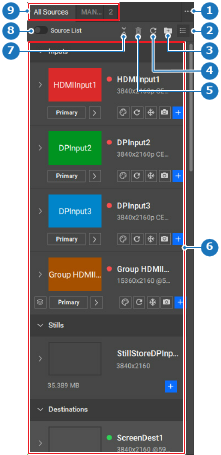
    Image 8–109
    1
    Folder menu
    2
    Source view options
    3
    Source organise menu
    4
    Refresh input thumbnail button
    5
    Delete button
    6
    Available sources
    7
    Collapse or expand all sources
    8
    Toggle source list view
    9
    Source folders
  2. Click on the right arrow () below the thumbnail (reference 26) of the desired input.
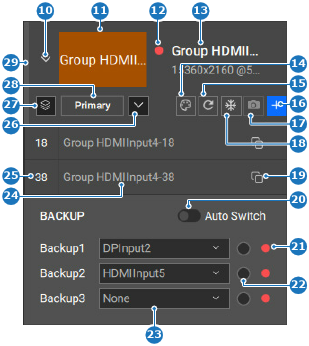
    Image 8–110
    10
    Show or hide sources
    11
    Input thumbnail
    12
    Signal validity icon
    13
    Input name input field
    14
    Thumbnail background color menu
    15
    Refresh thumbnail button
    16
    Add source button
    17
    Capture still button
    18
    Freeze input button
    19
    Copy source button
    20
    Toggle auto backup signal
    21
    Backup signal validity icon
    22
    Manual backup source radio button
    23
    Backup source drop down
    24
    Source name input field
    25
    Source ID input field
    26
    Show or hide backup section
    27
    Show or hide group sources
    28
    Backup or primary source button
    29
    Input usage indicator
  3. Select a backup source from the drop down after Backup (reference 23, Image 8–110).

    Note: Backup1 will be used first. If Backup1 is also offline, then Backup2 will be used. If Backup2 is also offline then Backup3 will be used. If Backup3 is also offline, then there will be no image.
    Tip: A maximum of three backup inputs can be defined.
    Tip: Stills can be set as a backup input. It is recommended to have the last backup input set as a still.
    Tip: Active inputs will have an active icon ().

    Offline inputs will have an inactive icon ().

  4. Click on the radio button (reference 22, Image 8–110) to manually switch to the selected backup. (optional)
  5. Click on the slider in front of Auto Switch (reference 20, Image 8–110) to turn on the automatic backup functionality.

    The label under the thumbnail (reference 28, Image 8–110) indicates whether the Primary source is active or a Backup source is active.

  6. Click the save icon () in the header.