8.15.3.1 Automatic mapping

Location

Navigation side bar: Controller

About automatic mapping

Automatic mapping assigns multiple functionalities or targets to a range of buttons sequentially. This can be used to quickly populate each controller button.

How to map
  1. Must the assign buttons always be auto populated?
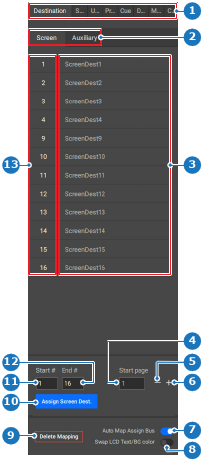
    • If yes, enable the toggle button after Auto Map Assign Bus (reference 7) from the left panel.
    • If no, go to next step.
    Image 8–155
    1
    Category selection
    2
    Folder or subcategory selection
    3
    Options list
    4
    Start page number input field
    5
    Decrease start page number
    6
    Increase start page number
    7
    Auto map assign bus toggle button
    8
    Swap text color and background color toggle button
    9
    Delete mapping button
    10
    Assign button
    11
    Start number input field
    12
    End number input field
    13
    Options number list
  2. Select the desired category (reference 1, Image 8–155) from the left panel.
  3. Select the desired folder or subcategory (reference 2, Image 8–155).
  4. Enter the number of the first desired item after Start # (reference 11, Image 8–155).
  5. Enter the number of the last desired item after End # (reference 12, Image 8–155).
  6. Set the start page where the mapping must start using one of the following methods:

    • Entering a value (reference 4, Image 8–155): enter any desired value in the input field.
    • Using the + and - buttons: click on the + (reference 6, Image 8–155) to increase the value with one point and on the - (reference 5, Image 8–155) to decrease the value with one point.
  7. Click the assign button (reference 10, Image 8–155).
  8. Click the save icon () in the header.