8.12.9 Multiple sources

Location
  1. Navigation side bar: Programming
  2. Left panel: All Sources
About multiple sources

Multiple sources allow the user to copy the incoming signal. This copy can then be modified to apply changes to the incoming signal. Each copy can have its own sets of modifications. Making it possible to quickly switch between different modifications and the source signal. For more information on how to edit the way each source looks, see “Editing a source”.

How to add
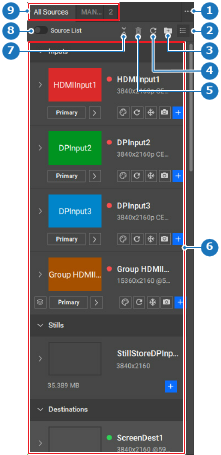
  1. Is the Source List toggle button (reference 8) enabled?

    • If yes, disable the Source List toggle button (reference 8) and go to next step.
    • If no, go to next step.
    Image 8–111
    1
    Folder menu
    2
    Source view options
    3
    Source organise menu
    4
    Refresh input thumbnail button
    5
    Delete button
    6
    Available sources
    7
    Collapse or expand all sources
    8
    Toggle source list view
    9
    Source folders
  2. Click the plus icon () of the desired source (reference 16).
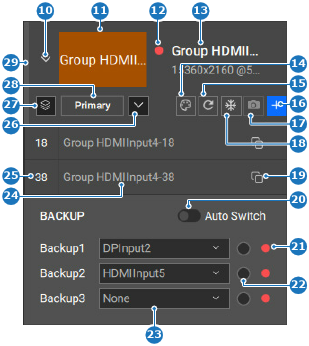
    Image 8–112
    10
    Show or hide sources
    11
    Input thumbnail
    12
    Signal validity icon
    13
    Input name input field
    14
    Thumbnail background color menu
    15
    Refresh thumbnail button
    16
    Add source button
    17
    Capture still button
    18
    Freeze input button
    19
    Copy source button
    20
    Toggle auto backup signal
    21
    Backup signal validity icon
    22
    Manual backup source radio button
    23
    Backup source drop down
    24
    Source name input field
    25
    Source ID input field
    26
    Show or hide backup section
    27
    Show or hide group sources
    28
    Backup or primary source button
    29
    Input usage indicator
  3. Rename the source by double clicking on the name (reference 24, Image 8–112).

    Tip: If the source list is turned off, then the sources can be displayed by clicking on the right arrow () before the thumbnail or name of the input (reference 10, Image 8–112).
    Tip: Provide clear names that reflect the intended purpose.
  4. Click the save icon () in the header.