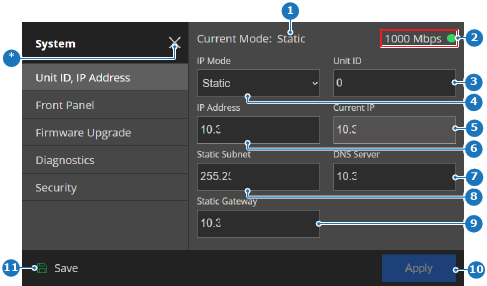
5.2.1 Unit ID, IP address

DHCP
Dynamic Host Configuration Protocol is a protocol that manages IP addresses. When a device is connected to a DHCP network, the DHCP server will assign an unused IP address to the connected device automatically. This ensures all connected devices have unique IP addresses within the same range.
Location

System > Unit ID, IP address

About unit ID

The Unit ID is used during linking and allows software to differentiate each Encore3 with a designated number. This number can either be a ‘0’ or a ‘1’. It is recommended to assign ‘0’ to the host unit.

About IP address

Two main methods for IP configuration are possible:

Connection indicator

The Encore3 will automatically test the signal validity and speed of any cable connected to the ‘Control’ port. Results of this test will be shown in the indicator with the following states:

Note: The indicator only signals the quality of the connected cable. Other issues can prevent the Encore3 from connecting to the network. For more information, see “Troubleshooting abnormal Encore3 behavior”.
IndicatorSpeed (Mbps)Description
Red0No connection detected
Green0 - 1000Slower connection detected
Green1000+Faster connection detected
How to configure
  1. Select the desired mode from the drop down box after IP Mode (reference 9).

    • In case of DHCP, go to step 3.
    • In case of Static, go to next step.
    Image 5–4
    1
    Current IP mode label
    2
    Connection indicator
    3
    Link ID input field
    4
    IP mode drop down
    5
    Current IP address label
    6
    IP address input field
    7
    DNS server input field
    8
    Subnet mask input field
    9
    Default gateway input field
    10
    Apply button
    11
    Save button
    *
    Close button
  2. Fill out the required network information (reference 4 through 9, Image 5–4) using the number pad pop-up. For more information, contact the local IT department.
  3. Must the ID of the unit be changed?

    • If yes, enter the desired ID in the input field after Unit ID (reference 3, Image 5–4).
    • If no, go to next step.
  4. Tap Apply (reference 10, Image 5–4) to confirm the settings.

    The IP changes are applied when the Current IP label (reference 4, Image 5–4) is updated.

  5. Tap Save (reference 11, Image 5–4).