7.4.3 Creating a new user

Location and availability
How to create a new user
  1. In the settings menu, click Users.

    Image 7–59 Settings menu, Users

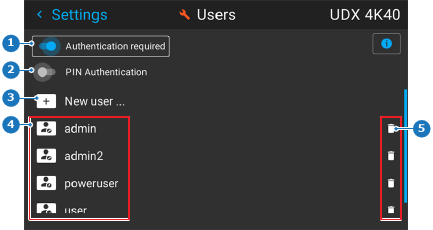
    The Users menu will be displayed.

    Image 7–60 Example of the Users menu
    1
    Authentication required toggle
    2
    PIN authentication
    3
    New User button
    4
    Example of existing users
    5
    Delete icon for each user
  2. Select New user... and confirm.

    The New user menu will be displayed.
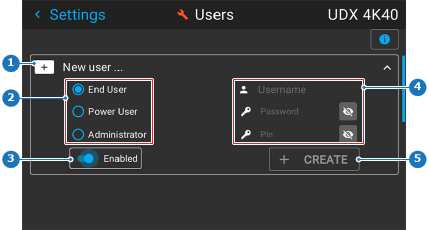
    Image 7–61 Example of the new user pane
    1
    New user pane
    2
    User group
    3
    Enable toggle
    4
    User credentials
    5
    Create button
  3. Enter the user settings as follows:

    • User group: Choose between End user, Power user or Administrator.[10]
    • User name: Enter a text of maximum 64 characters
    • Password: Enter a code of minimum 8 characters[11]
    • Pin code: Choose a pin code of 4–6 digits.[12]
    • Enable user toggle: Use this when certain users can only have access to the projector for a limited time (e.g. a short, but recurring event).
  4. Click Create.
Note: It may take some time for the new user is visible in the list of users.

[10] A service user cannot be created, nor edited.

[11] When it comes to creating strong passwords, length of the password is more important than the complexity. It is safer to opt for a password of 16 characters that is not “complex” rather than a “short” password that is very complex.

[12] PIN codes cannot start with 0.