7.6.4 Date and time sync

Location & availability
About date and time

By default, the calendar and the internal clock of the ClickShare system are based on the selected time zone. It is possible to overwrite the time zone clock with a time server of choice or a manual time. For more information, see the following procedure.

How to configure
  1. Must a time server be used?
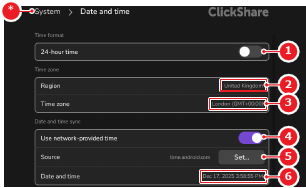
    • If yes, enable the toggle button after Use network-provided time (reference 4). Go to next step.
    • If no, disable the toggle button after Use network-provided time (reference 4). Go to step 5.
    Image 7–26
    1
    Time format toggle
    2
    Region drop down
    3
    Time zone drop down
    4
    Network time toggle
    5
    Time server menu
    6
    Calendar menu
    *
    Return button
  2. Tap Set... (reference 5, Image 7–26) to change the time server.

    A pop-up is shown.

  3. Enter the desired time server IP address or domain name in the input field (reference 7).

    Tip: Tap Default (reference 8) to enter the default time server time.android.com.
    Image 7–27
    7
    Time server input field
    8
    Default time server button
    9
    Cancel button
    10
    Confirmation button
  4. Tap Done (reference 10, Image 7–27). No further actions required.

    The date and time is synced to the selected server. This can take a few minutes, depending on the network speed.

  5. Tap the date label after Date and time (reference 6, Image 7–26).

    A calendar and a time wheel are displayed.

  6. Tap on the desired date from the calendar (reference 12).

    Tip: The month can be changed by clicking the ‘<’ () and ‘>’ () arrow icons or by swiping left or right on the calendar.
    Image 7–28
    2
    Region drop down
    3
    Time zone drop down
    4
    Network time toggle
    5’
    Time server label
    6
    Calendar menu
    11
    Month selector
    12
    Date selector
    13
    Time selector
    14
    Cancel button
    15
    Save button
    *
    Return button

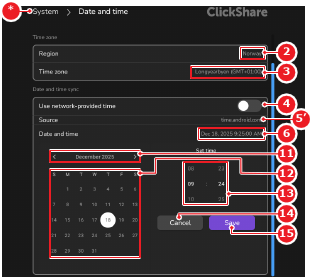
    The selected date has a white circle as background.

  7. Swipe up or down on the hour and minutes after Set time (reference 13, Image 7–28) until the desired time is in the middle of the wheel.
  8. Tap Save (reference 15, Image 7–28).

    The selected date and time are applied and shown after Date and time (reference 6, Image 7–28).