2.5 Dual workstation setup with KVM switch

About

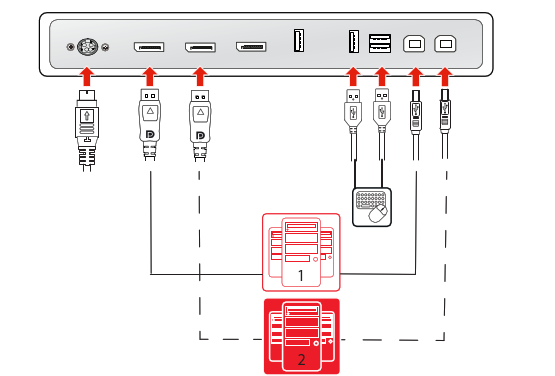
In this setup, the display is connected to two different workstations, each with one DisplayPort cable. When connecting a USB cable from your display to each of the two workstations, you can control both workstations with a single keyboard and mouse connected to the display. Switching the video and controls signals between the two workstations is done with the KVM switch operated via the OSD menu.
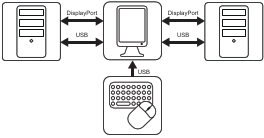
Image 2–7
Note: Barco suggests to have QAWeb installed on only one of both workstations. When both workstation would have QAWeb installed, switching KVM inputs would trigger a Configuration Change event, causing the display to disappear from the workstation in QAWeb.
Install the display controller

Before you connect your display with the workstation, make sure to have a suitable display controller installed in the workstation. For a list of compatible display controllers, please refer to the compatibility matrix available at https://www.barco.com/support/docs/TDE12111

Tip: The Nio Color 5.8MP operates at its full potential when used with a Barco display controller and Barco video driver. These high-performing graphics cards have the power and capabilities to optimally render images for this display. Moreover, Barco display controllers enable the use of Barco’s Intuitive Workflow Tools that are designed to increase visibility of subtle details, improve focus during reading sessions, and accelerate workflow. Please visit www.barco.com/product/intuitive-workflow-tools for more information.
Connect the cables
  1. Remove the connector cover.
  2. Connect DisplayPort input 1 (DP IN 1) with the DisplayPort output on workstation 1.
  3. Connect the main USB upstream connector (USB UP 1) with a USB host on workstation 1.
  4. Connect DisplayPort input 2 (DP IN 2) with the DisplayPort output on workstation 2.
  5. Connect the secondary USB upstream connector (USB UP 2) with a USB host on workstation 2.
  6. Connect a keyboard and mouse (or another peripheral used to control the workstations) with the USB downstream connectors of the display.
  7. Connect the supplied external DC power supply to the power input on the display.
  8. Route all cables through the cable clips in the connector compartment.
  9. Re-install the connector cover: slide the top of the cover in the available recesses, then push the bottom of the cover back into position.
  10. Route some or all cables through the routing channels in the stand of your display.
  11. Connect the external DC power supply to a grounded power outlet by using one of the power cables included with the display.
Image 2–8
Note: When DPMS mode with USB charging is enabled (see “DPMS mode”) and hibernate is enabled (see “Hibernate”), you can easily awaken your system from hibernate with a mouse/keyboard connected to the display.

When DPMS mode without USB charging is enabled (see “DPMS mode”) and hibernate is enabled (see “Hibernate”), you can only awaken your system with a mouse/keyboard connected to the workstation (and not to the display).

Power on the display system
  1. Press/Turn the touch keyboard to activate your display.
  2. Switch on the workstations connected to your display.

Your display will be running in a basic video mode at a default refresh rate when first time starting up

Install the Barco SW Package

The Nio Color 5.8MP operates at its full specifications when driven by a Barco display controller and driver. These high-performing graphics cards have the power and features necessary to meet most diagnostic imaging needs. Moreover, Barco display controllers enable the use of Barco’s Intuitive Workflow Tools that are designed to increase visibility of subtle details, improve focus during reading sessions, and accelerate workflow. Please visit www.barco.com/product/intuitive-workflow-tools for more information.

Enable the KVM switch
  1. Bring up the OSD main menu.
  2. Navigate to the Image Settings menu.
  3. Enter the KVM Switch submenu.
  4. Select Enabled and confirm.
Note: When enabling the KVM switch, the Image Source menu will be inaccessible.
To switch KVM inputs
  1. Press or turn the touch keyboard to activate the shortcut bar. The KVM switch icon () is now selected by default because the KVM switch is enabled.
  2. Press the touch keyboard again to switch KVM inputs.
Tip: During normal operation, double-press the Menu key of the touch keyboard to switch KVM inputs more quickly. A first click will make the shortcut bar pop up, a second click will switch inputs (since the KVM switch icon is selected by default when the KVM switch is enabled).
Note: When switching KVM inputs, the video is switched instantly while switching the USB signal might take a little longer (up to 2 seconds).