Warning: It is not allowed to operate the Base Unit outside its intended geographical region.
About Wi-Fi
A connection with the Base Unit can be made via a wireless connection. A fixed wireless IP address is used to establish the connection.
The transmission power of the wireless signal can be reduced.
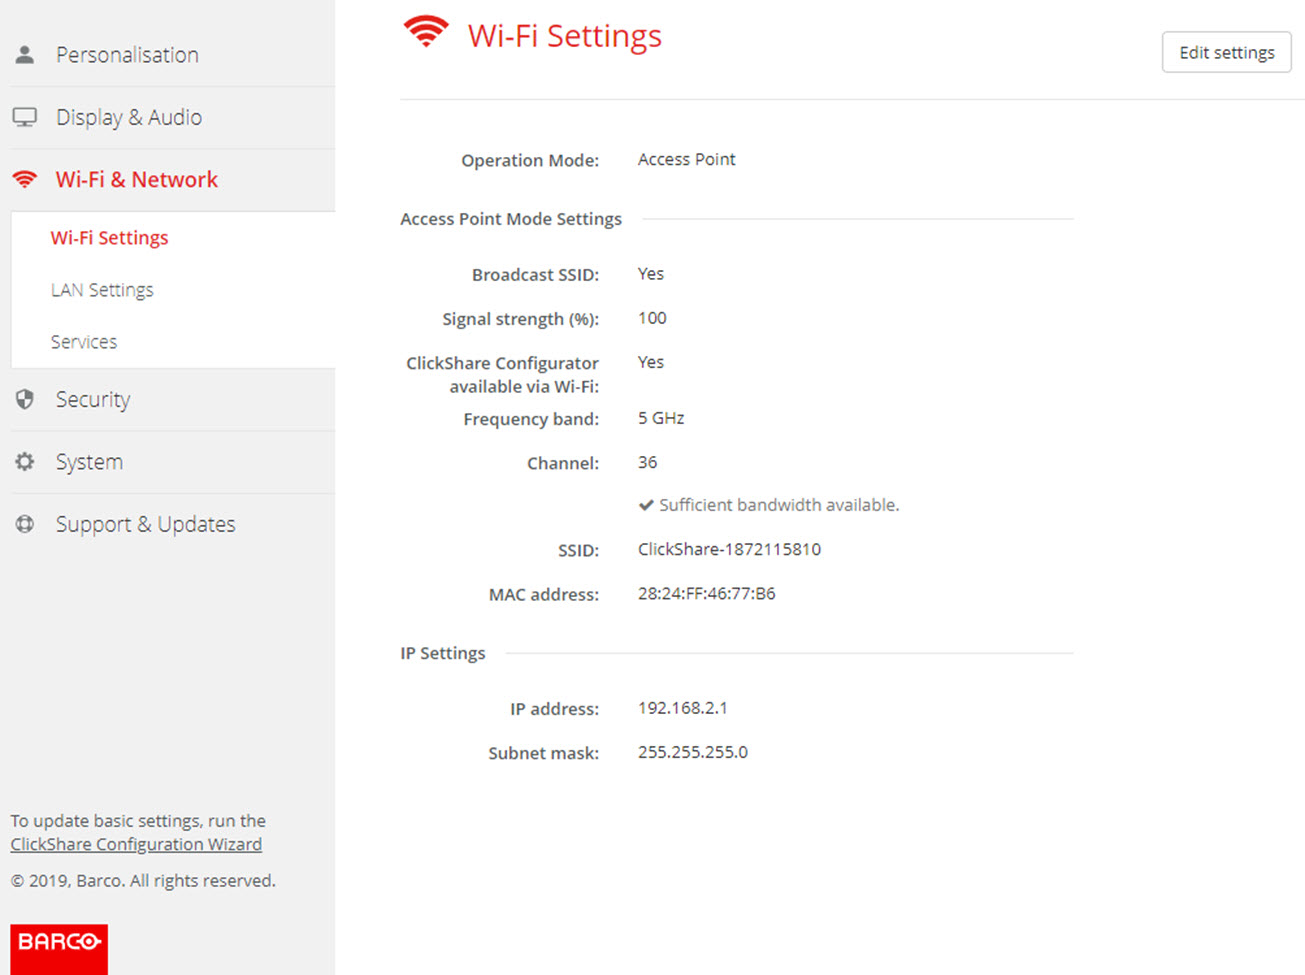
An overview of the current settings is given when Wi-Fi Settings is selected and operational mode is Access Point.
Image 6–17Wi-Fi settings
When operational mode is set to Off. The following info is given: “The wireless interface is disabled. Buttons must be configured to connect to another Wi-Fi access point. Click here to go to the Button configuration page”.
Click on here to start the Button configuration. For more info, see “Buttons”.
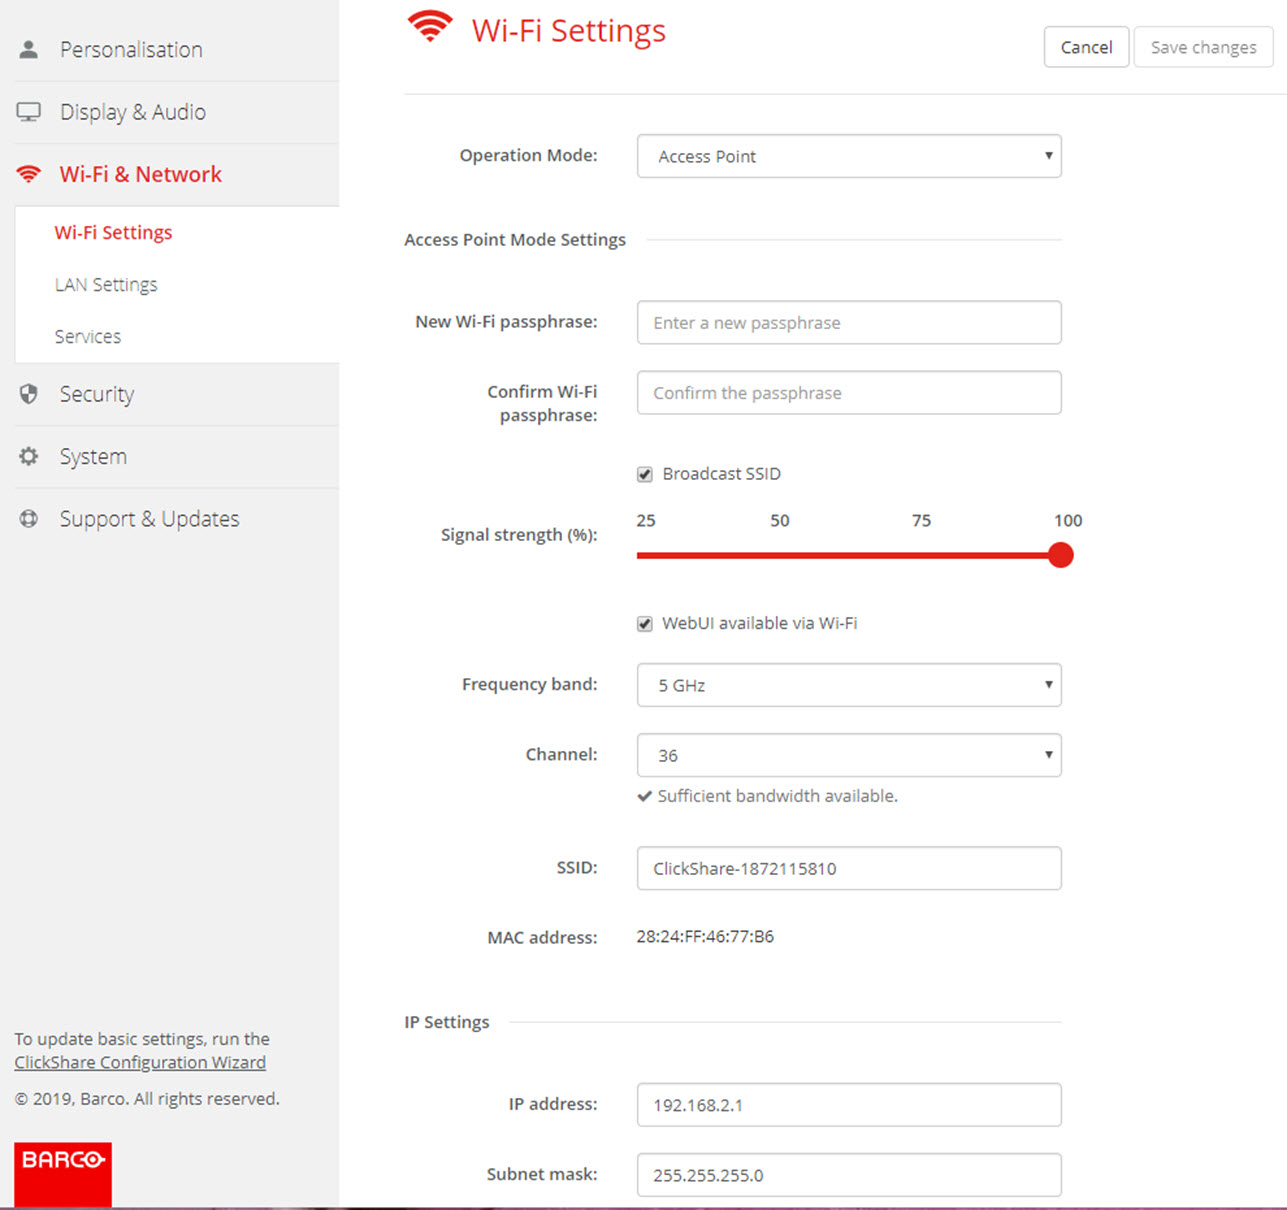
To change any Wi-Fi-setting, click on Edit settings. The view depends on the previous selected operational mode. Here given with Access Point selected.
Image 6–18Wi-Fi settings, edit
Note: Changing the IP address will require a repairing of the Buttons used with this Base Unit.
Change operational mode
Log in to the Configurator.
Click Wi-Fi & Network → Wi-Fi Settings.
Click Edit settings.
Click on the drop down box next to Operational Mode and select the desired mode.
The following options are possible:
Access Point: continue with the next blocks in this topic.
Wireless Client (only for CSE-200+)
Off
About frequency band & channel selection
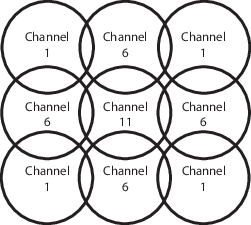
In an ideal setup, overlapping channels should not be used for two ClickShare Base Units within range of each other. As the channels in the 2.4 GHz band overlap with each other, best practice is to use channels 1, 6 and 11 on a single floor. On floors above and below, the channel pattern will be shifted to avoid overlap between floors, e.g. by placing channel 6 at the center of the illustrated pattern.
Image 6–19
To limit the effect of overlapping networks, it is highly recommended to reduce the signal strenght (standard range of about 30m) of the ClickShare Base Units. Reducing the signal strenght to its minimal value will reduce the actual range of the ClickShare to about 10m. By doing so, the size of coverage overlapping area will shrink and the risk for quality degradation will decrease or even disappear.
The 5 GHz channels do not overlap with each other and are less used by non-Wi-Fi devices than the 2.4 GHz channels. Moreover, 5 GHz signals are more rapidly damped than 2.4 GHz signals. Therefore, the use of a 5 GHz channel is recommended. This will limit the impact of a ClickShare system on other installed ClickShare units and on other WLAN users.
Frequency band & channel selection
Select the wireless connection channel by clicking on the drop down box and selecting the desired channel.
The channels available in the list vary according to the regional version of your Base Unit. Re-pairing the Buttons is not required when changing the frequency band or wireless connection channel.
Ideally, the ClickShare channel is selected after conducting a wireless site survey. A site survey maps out the sources of interference and the active RF systems. There are several Wi-Fi survey tools available on the market. Based on the results from a site survey, the least occupied channel can be found and selected for each meeting room.
Select the wireless connection frequency band: 2.4 GHz or 5 GHz by clicking on the drop down box and selecting the correct band.
Below the channel selection pane, an indication is given of the available bandwidth of the current channel. To see if sufficient bandwidth is available in a different channel, select the channel in the drop down and save the changes. The page will reload with the new settings and an indication of the channel fit will be given after approximately 1 minute. There is no need to reload the page to see the result.
The channels available in the list vary according to the regional version of your Base Unit. Re-pairing the Buttons is not required when changing the frequency band or wireless connection channel.
When Intense use, change to another Wi-Fi channel is displayed, change to another channel. The page will reload after approximately 1 minute.
SSID & passphrase
Enter a public name (SSID) for the wireless network.
The default SSID is ClickShare-<serial number Base Unit>.
If you want to broadcast this SSID, check the checkbox before Enable SSID broadcast.
Enter a new Wi-Fi passphrase and confirm that passphrase.
Caution: It is strongly recommended to change the Wi-Fi passphrase on first use to prevent anyone else accessing the Wi-Fi network.
Signal strength
Select the Signal Strength. Click on the slider and reduce the broadcasted power (signal strength) until the desired strength is obtained.
Note: Too low power and interference by others might lead to connection issues. If so, increase again the signal strength until the issues are solved.
By default the strength is set to 100%.
Reducing the signal strength limits the effect of overlapping networks in the 2.4 GHz channels. Not necessary for the 5 GHz channels as their is no overlap.
ClickShare Configurator (WebUI) access via Wi-Fi
To allow access to the configurator via Wi-Fi, check the check box in front of WebUI available via Wi-Fi.
Checked: Configurator accessible via Wi-Fi.
Not checked: access to the configurator via Wi-Fi is blocked.
IP address & subnet mask
Log in to the Configurator.
Click Wi-Fi & Network → Wi-Fi Settings.
To change the IP address or subnet mask, click in the input field and enter the 4 octets of the new IP address or subnet mask.
Note: This must NOT be 0.0.0.0 for static IP-Address assignment.