Open the XMS Cloud linking page of the desired Base Unit from one of the locations mentioned in the “Introduction”.
How to link
Log in or register the desired myBarco account. (optional)
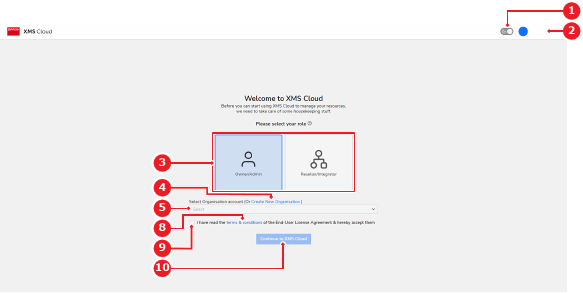
The XMS Cloud linking landing page is shown.
Select the role of the logged in account (reference 3).
Note: This option only appears the first time the account is used. Contact Barco support if the role of the account must be changed.
Image 4–5
1
Light/dark mode toggle
2
Logged in account menu
3
Role options
4
New organisation link
5
Existing organisation drop down
8
Terms and conditions link
9
Terms and conditions agreement
10
Continue button
Which organisation must the Base Unit be linked with?
In case of a new organisation, click on the Create New Organisation link (reference 4, Image 4–5). Go to next step.
In case of an existing organisation, select the desired organisation from the drop down (reference 5, Image 4–5). Go to step 5.
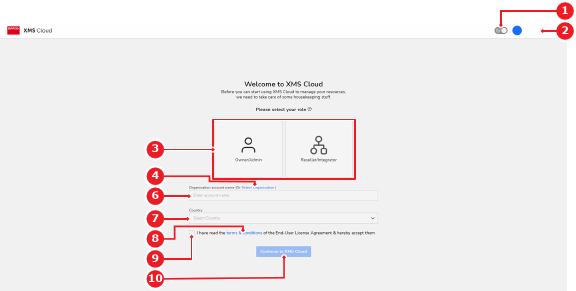
Create a new organisation.
Enter a name for the organisation in the input field (reference 6).
Select the country where the organisation is located from the drop down (reference 7).
Image 4–6
1
Light/dark mode toggle
2
Logged in account menu
3
Role options
4
Existing organisation link
6
Account name input field
7
Country drop down
8
Terms and conditions link
9
Terms and conditions agreement
10
Continue button
Check the check box (reference 9, Image 4–5 or Image 4–6) to agree with the XMS Cloud terms and conditions and end user license.
Note: Read the terms and conditions by clicking the link (reference 8, Image 4–5 or Image 4–6)
Click Continue to XMS Cloud (reference 10, Image 4–5 or Image 4–6) to continue the linking.
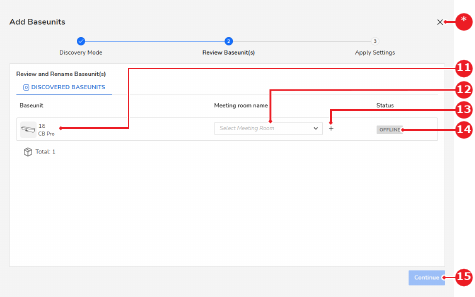
The review Base Unit(s) pop-up in XMS Cloud is shown.
Which meeting room setup is used?
In case of a pre-provisioned meeting room setup, select the desired meeting room from the drop down (reference 12).
In case of a new meeting room setup, click the ‘+’ icon (reference 13) and enter the desired name of the meeting room in the input field (reference 12).
Tip: When the ‘+’ icon (reference 13) is pressed, the meeting room drop down (reference 12) is turned into an input field and the switch meeting room setup icon is changed to an ‘x’. Clicking the ‘x’ will return the interface back to the pre-provisioned setup.
Image 4–7
11
Base Unit identification label
12
Meeting room drop down or meeting room name input field