3.4 Front menu

About the front menu

The MDSC-8427 has a front menu which is used to activate the OSD main menu but which also supports 3 user key functions. These user keys allow to immediately activate a commonly used function without having to access and browse the OSD menus. Each user key is customizable in the OSD menus, where the associated function is defined (see “Front menu user keys”).

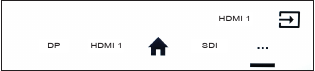
Example of front menu configuration:

Image 3–1
  1. Brightness 
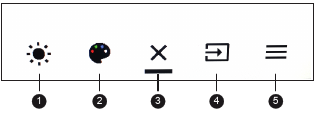
adjustment (User key 1)
  2. Color space selection (User key 2)
  3. Exit
  4. Main source selection (User key 3)
  5. OSD main menu activation

When a function associated to a user key is not available for the current display configuration, it will be grayed out in the front menu. Example: If Color space was associated to user key 2 but the Gamma setting in the OSD menu is set to DICOM, then user key 2 will be grayed out in the front menu.

Image 3–2

When front menu functions have a submenu (eg. Main source selection), the submenu will be opened as new window on top of the front menu. The icon of the parent function and the currently selected option are shown in the top right corner of the new window. When the number of selectable options is greater than 4, the “select more” icon (...) will be visible and allows to see the remaining options.

Image 3–3
Front menu icons explained

Depending on where you are in the front menu and depending on the functions associated to the user keys, the following icons can be visible:

IconDescriptionIcon Description
Navigate rightSelect a color space preset
Navigate leftSelect a profile
Navigate upSelect DVI as the main input source
Navigate downSelect SDI as the main input source
Activate OSD main menuSelect HDMITM 1 as the main input source
Exit front/OSD menuSelect HDMITM 2 as the main input source
Exit the OSD menu and return to the front main menu.Select DisplayPort as the main input source
Select more (when the number of selectable options in the fron menu is greater than 4)Select a gamma preset
Select a main input sourceEnable/disable horizontal flip
Adjust the brightness levelSelect a Picture in Picture mode
Front menu icons explained

Depending on where you are in the front menu and depending on the functions associated to the user keys, the following icons can be visible:

IconDescriptionIcon Description
Navigate rightSelect a profile
Navigate leftSelect DVI as the main input source
Navigate upSelect SDI as the main input source
Navigate downSelect 4K SDI as the main input source
Activate OSD main menuSelect HDMITM 1 as the main input source
Exit front/OSD menuSelect HDMITM 2 as the main input source
Exit the OSD menu and return to the front main menu.Select DisplayPort as the main input source
Select more (when the number of selectable options in the fron menu is greater than 4)Select a gamma preset
Select a main input sourceEnable/disable horizontal flip
Adjust the brightness levelSelect a Picture in Picture mode
Select a color space preset  
To activate the front menu

With the front keyboard:

  1. Unlock the front keyboard (see “Front keyboard locking/unlocking”). When the front keyboard is unlocked with the front keyboard itself, the front menu will automatically appear. When the front keyboard is unlocked with the rear keyboard, proceed to the next step.
  2. With the keyboard unlocked, shortly press the key.

With the rear keyboard:

  1. Shortly press the center button and the front menu will immediately appear.
Note: If the OSD lock window appears then this means that the front menu and OSD menu is locked for access. Please refer to “Control lock” for more information and instructions to unlock the menus.
To navigate and use the front menu

With the front keyboard:

Each function in the front menu is immediately activated by pressing the corresponding key on the front keyboard.

With the rear keyboard:

To customize the front menu user keys

Please refer to “Front menu user keys