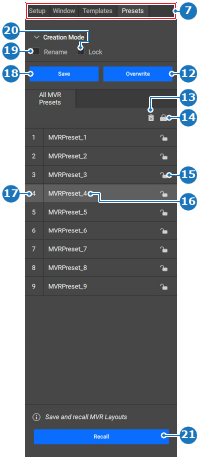
8.11.3 MVR presets

Location
  1. Navigation side bar: MVR
  2. Right panel: Presets
About MVR presets

A preset will store which layout is active on all checked MVRs and whether or not they are selected. What is in the layout is not stored in the preset. Therefore, if a layout is changed it cannot be restored with MVR presets. Up to 10 different presets can be created.

Prerequisites

Create the desired MVR layouts for each available MVR. For more information, see “Editing an MVR layout”.

How to save
  1. Check the desired MVRs or View All (reference 1) at the top panel of the central work window.

    Tip: The selection with a light grey background (reference 2) is displayed in the central work window. Changes can affect MVRs that are not being displayed.
    Image 8–84
    1
    Checkbox
    2
    Selection background
  2. Select the layout to save as a preset from the layout drop down (reference 5).

    Tip: By default layout1 gets auto populated depending on the configuration. If layout1 is overwritten, then the auto population no longer happens.
    Image 8–85
    3
    Unit ID drop down (only for View All)
    4
    MVR drop down (only for View All)
    5
    Layout drop down
    6
    Central work area zoom drop down
  3. Must a new preset be created?

    • If yes, select whether the new preset must be renamed (reference 19) or locked (reference 20) and click Save (reference 18).
    • If no, select an unlocked (reference 15) preset (reference 16) and click Overwrite (reference 12).
    Image 8–86
    7
    Category selection
    12
    Overwrite selected preset button
    13
    Delete selected preset button
    14
    Lock or unlock all presets button
    15
    Lock or unlock preset button
    16
    Rename preset input field
    17
    Preset ID input field
    18
    Save preset button
    19
    Rename check box
    20
    Lock check box
    21
    Recall preset button
  4. Double click the name of the preset (reference 16, Image 8–86) to rename the preset.

    • If yes, enter the name of the preset in the input field (reference 16, Image 8–86).
    • If no, double click the name of the preset (reference 16, Image 8–86) to rename the preset.
    Tip: Provide clear names that reflect the intended purpose.
  5. Must the preset be locked?

    • If yes, set the lock icon after the preset name (reference 15, Image 8–86) to locked ().
    • If no, set the lock icon after the preset name (reference 15, Image 8–86) to unlocked ().
  6. Click the save icon () in the header.