8.11.2 Editing an MVR layout

UMD
Under Monitor Display (UMD) is a user interface element for Event Master Toolset. It holds the name of the window it is attached to and a background color. The UMD is layered on top of the window and helps with identifying what that window is supposed to be. UMDs are typically only displayed within the software and not on the image. However, MVRs send the UMD with the image by default. This helps with providing context of each content window.
Location
  1. Navigation side bar: MVR
  2. Left panel: All Sources
  3. Right panel: Setup or Window or Templates or Presets
Template layouts

Some MVR layout suggestions have been added as templates. These templates will create grids of windows in the shape specified by its name. These templates can be modified further or used as final layout.

How to edit
  1. Check the desired MVRs or View All (reference 1) at the top panel of the central work window.

    Tip: The selection with a light grey background (reference 2) is displayed in the central work window. Changes can affect MVRs that are not being displayed.
    Image 8–76
    1
    Checkbox
    2
    Selection background
  2. Select the layout to modify from the layout drop down (reference 5).

    Tip: Each MVR can have up to 10 different layouts prepared.
    Tip: By default layout1 gets auto populated depending on the configuration. If layout1 is overwritten, then the auto population no longer happens.
    Image 8–77
    3
    Unit ID drop down (only for View All)
    4
    MVR drop down (only for View All)
    5
    Layout drop down
    6
    Central work area zoom drop down
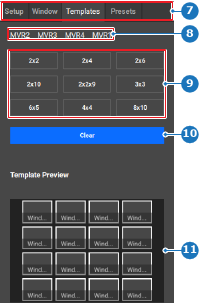
  3. Must a template layout be used?

    Note: These templates will overwrite any existing layout.
    • If yes, select the desired grid layout (reference 9) under category Templates (reference 7) in the right panel. Go to next step.
    • If no, go to next step.
    Image 8–78
    7
    Category selection
    8
    Affected MVRs
    9
    Template layout options
    10
    Clear layout button
    11
    Template preview image
  4. Add windows to the central work area using one or multiple of the following methods:
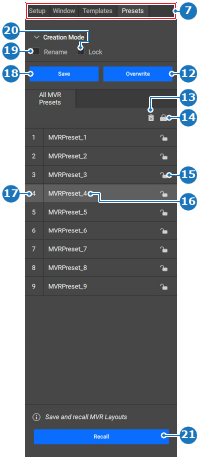
    • Recall a preset (reference 21) from the right panel under Presets (reference 7). For more information on creating presets, see “MVR presets”.
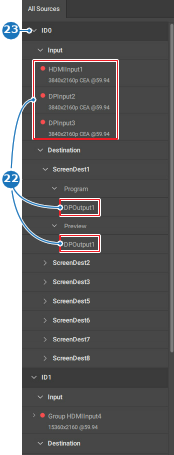
    • Drag and drop any desired source from the left panel All Sources (reference 22) to the central work panel.
    Note: Windows are not allowed to overlap. The UMD is not considered part of the window.
    Tip: If a source from the left panel is dropped on a window that already has a source, then the source will be overwritten with the dragged source from the left panel.
    Tip: If the list is hidden, then click the arrow ().
    Image 8–79
    7
    Category selection
    12
    Overwrite selected preset button
    13
    Delete selected preset button
    14
    Lock or unlock all presets button
    15
    Lock or unlock preset button
    16
    Rename preset input field
    17
    Preset ID input field
    18
    Save preset button
    19
    Rename check box
    20
    Lock check box
    21
    Recall preset button
    Image 8–80
    22
    Possible sources
    23
    Collapse or expand button
  5. Adjust the position, the size and the name of the windows using one or multiple of the following methods:
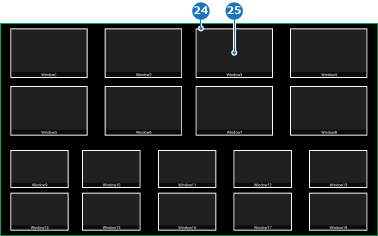
    • Click and drag the edge of the window (reference 24) in the central work window to adjust the size.
    • Click and drag the window (reference 25) in the central work window to the desired position.
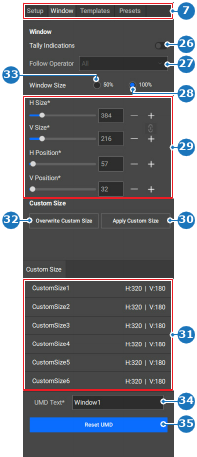
    • Adjust the window using the options (reference ) from the Window category (reference 7) from the right panel.
    • Align the selected windows using the icons (reference 36 through 50) in the bottom panel.
    • Remove an unwanted window using the Clear button (reference 51) in the bottom panel.
    • Show or hide the UMD (reference 52), the Border (reference 53) and the AOI Marker (reference 54) in the bottom panel.
    Note: Windows are not allowed to overlap. The UMD is not considered part of the window.
    Tip: Provide clear names that reflect the intended purpose.
    Tip: The border, AOI (Area Of Interest) marker and UMD (Under Monitor Display) label can be hidden from the MVR using the bottom panel. They will remain visible in the software.
    Image 8–81
    24
    Window resize position
    25
    Window drag position
    Image 8–82
    7
    Category selection
    26
    Tally indicator toggle
    27
    Tally operator drop down
    28
    100% window size radio button
    29
    Custom window size and position section
    30
    Apply selected custom size button
    31
    Stored custom size list
    32
    Overwrite selected custom size
    33
    50% window size radio button
    34
    UMD text input field
    35
    Reset UMD button
    Image 8–83
    36
    Left align selection
    37
    Vertical middle align selection
    38
    Right align selection
    39
    Top align selection
    40
    Horizontal middle align selection
    41
    Bottom align selection
    42
    Horizontal distribute selection
    43
    Vertical distribute selection
    44
    Align with right MVR border
    45
    Align with bottom MVR border
    46
    Align with the center of the MVR
    47
    Align with the vertical center of the MVR
    48
    Align with the horizontal center of the MVR
    49
    Align with top MVR border
    50
    Align with left MVR border
    51
    Remove selections
    52
    Toggle UMD button
    53
    Toggle border button
    54
    Toggle AOI marker button
    55
    Size window to size of the source button
    56
    Select all windows button
    57
    Deselect all windows button
    58
    Copy layout button
  6. Click the save icon () in the header.