8.13.2 External devices

Location
  1. Navigation side bar: External Devices & Cues
  2. Left panel: Device(s)
  3. Right panel: Configuration > External Device Info
About external devices

Event Master Toolset can connect to virtually any network connected device. These devices are categorised in the following sub groups of the left panel:

Copying external devices

Creating a copy of an external device will create a new entry with the exact same settings and commands. This exact copy can then be edited to refer to another unit of a similar type. Removing the need to manually add every command and configuration multiple times.

Removing external devices

Select the desired devices in the left panel and click the delete icon () after the category name that the device is a part of. This will remove the device and all configured commands.

Tip: Hold CTRL or ⌘ to select multiple entries at once. If this does not work, enable the keyboard shortcuts in the settings. For more information, see “Keyboard shortcuts”.
How to add
  1. Which type of device must be added?

    • In case of Barco projector, click Add Barco Projector (reference 6). Go to step 3.
    • In case of Event Master device, click Add Other EM System(s) (reference 5). Go to next step.
    • In case of an Event Master XML list, click Add EM XML (reference 7). Go to step 3.
    • In case of a copy of an added device, click the copy icon () next to the name of the desired device (reference 3). Go to step 3.
    • In all other cases, click Add External Devices (reference 4). Go to step 3.
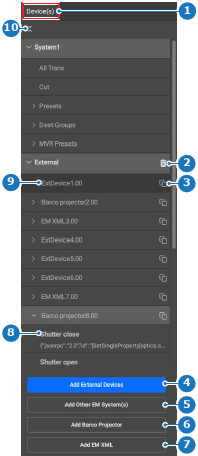
    Image 8–139
    1
    Category selection
    2
    Delete selected external device button
    3
    Copy external device button
    4
    Add external device button
    5
    Add other Event Master system menu
    6
    Add Barco projector button
    7
    Add Event Master XML button
    8
    Command name input field
    9
    External device name input field
    10
    Collapse or expand all external devices

    An entry of the desired category is created.

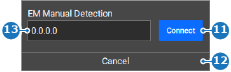
  2. Enter the IP address (reference 13) and click Connect (reference 11).

    Image 8–140
    11
    Connect button
    12
    Cancel button
    13
    IP address input field
  3. Select the created entry in the left panel.
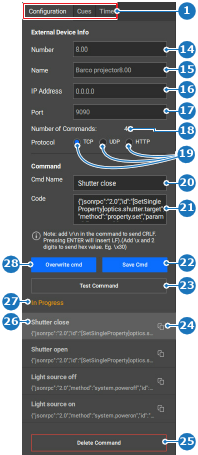
  4. Configure the device in the right panel.

    1. Enter the desired number of the device after Number (reference 14). (optional)
    2. Enter the desired name of the device after Name (reference 15).
    3. Enter the IP address of the device after IP Address (reference 16).
    4. Enter the port where the commands must be sent after Port (reference 17.
    5. Select the desired protocol for the commands after Protocol (reference 19).
    Note: Contact the local IT support for more information about the network fields.
    Note: Numbers must be unique.
    Tip: Up to two decimal numbers are allowed.
    Tip: The automatic numbering will ignore decimal numbers and add one to the highest whole number in the list.
    Tip: The number decides at which position it is located in the list.
    Tip: Provide clear names that reflect the intended purpose.
    Image 8–141
    1
    Category selection
    14
    External device number input field
    15
    External device name input field
    16
    External device IP address input field
    17
    External device port number input field
    18
    Total available commands label
    19
    Communication protocol radio buttons
    20
    Custom command name input field
    21
    Custom command input field
    22
    Save custom command
    23
    Test selected command
    24
    Copy command button
    25
    Delete selected command
    26
    Command name input field
    27
    Command status label
    25
    Overwrite selected command
  5. Click the save icon () in the header.