8.10.3.1 Linking units

Location
  1. Navigation side bar: Configuration
  2. Central work window: Detail View or System View
Prerequisites

The units must be physically linked with link cables. For more information, see: “Linking multiple Encore3 units”.

How to link
  1. Must the ID of the detected unit be changed?

    • If yes, click the edit button () after UNIT ID: (reference 3). Go to next step.
    • If no, go to step 4.
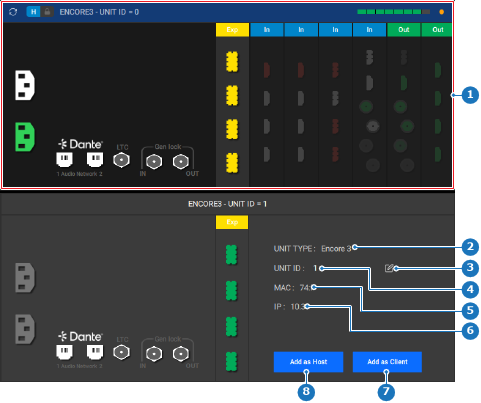
    Image 8–22
    1
    System with connected unit
    2
    Detected unit type label
    3
    Detected unit ID edit or confirm button
    4
    Detected unit ID input field or label
    5
    Detected unit MAC address
    6
    Detected unit IP address
    7
    Add unit as client button
    8
    Add unit as host button
  2. Enter the desired ID number in the input field (reference 4, Image 8–22).
  3. Click the confirm icon () after the entered ID (reference 3, Image 8–22).
  4. Must the unit be added as host or client?

    • In case of client, click the Add as Client button (reference 7, Image 8–22).
    • In case of host, click the Add as Host button (reference 8, Image 8–22).
    Tip: This can not be changed while the units are linked in Event Master Toolset.

    The units start communicating over the link cables.

  5. Wait until the synchronization is finished.
  6. Click the save icon () in the header.