8.12.3.1 Mixing or splitting layers

Location
  1. Navigation side bar: Programming
  2. Central work area: Layer bar
Prerequisites

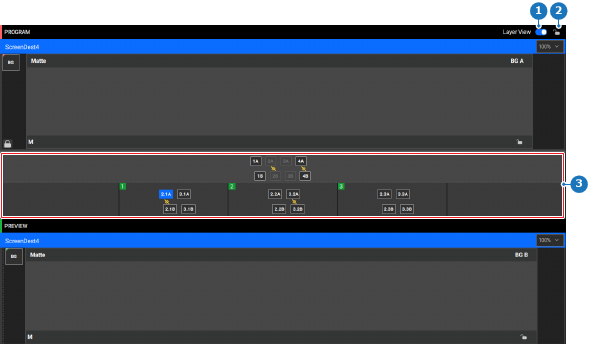
The screen layer bar is only visible when three or less destinations are being viewed in the central work area.

How to mix or split
  1. Is the screen layer bar visible in the middle of the central work area?
    • If yes, go to next step.
    • If no, enable the layer view toggle (reference 1) and go to next step.
    Image 8–95
    1
    Toggle layer view
    2
    Lock program layers
    3
    Layer bar
  2. Select either the ‘A’ or ‘B’ section of the desired layers in the layer bar (reference 3, Image 8–95).

    Tip: Hold CTRL or ⌘ to select multiple entries at once. If this does not work, enable the keyboard shortcuts in the settings. For more information, see “Keyboard shortcuts”.
  3. Are the layers mixed or split?

    • If mixed, click Split (reference 37) in the bottom panel to separate the ‘A’ and ‘B’ layer.
    • If split, click UnSplit (reference 37) in the bottom panel to merge the ‘A’ and ‘B’ layer.
    Note: It is not possible to mix layers with a different number. Meaning, layer ‘1A’ can only be mixed with ‘1B’ and no other layer.
    Tip: Split layers have the split icon () between the ‘A’ and ‘B’ layer.
    Tip: If the selection contains multiple layers in a different state, then the first selected layer will dictate the available behavior.
    Image 8–96
    4
    Left align selection
    5
    Vertical middle align selection
    6
    Right align selection
    7
    Top align selection
    8
    Horizontal middle align selection
    9
    Bottom align selection
    10
    Horizontal distribute selection
    11
    Vertical distribute selection
    12
    Make selections same size
    13
    Align selection with the right destination border
    14
    Align selection with the bottom destination border
    15
    Align selection with the center of the destination
    16
    Align selection with the vertical center of the destination
    17
    Align selection with the horizontal center of the destination
    18
    Align selection with the top destination border
    19
    Align selection with the left destination border
    20
    Move selection up in Z-order
    21
    Move selection to top in Z-order
    22
    Move selection to bottom in Z-order
    23
    Move selection down in Z-order
    24
    Size selection to fill horizontal
    25
    Size selection to fill vertical
    26
    Size selection to the source
    27
    Size selection to fill horizontal and vertical
    28
    Cut preview to program
    29
    Transition preview to program
    30
    Transition frames input field
    31
    Execute move animation button
    32
    Crossfade drop down
    33
    Toggle selected layer opacity in software
    34
    Lock or unlock selection
    35
    Arm button
    36
    Toggle selection between preview and program
    37
    Split or unsplit layer
    38
    Merge or unmerge layer
    39
    Match program to preview button
    40
    Reset modifications of selection
    41
    Reset modifications to all layers
    42
    Select all layers
    43
    Freeze selection
    44
    Swap layer modifications between preview and program
    45
    Hide or show selected layer from presets
    46
    Remove selections
  4. Click the save icon () in the header.
