8.12.10.2 Adding a source

Location
  1. Navigation side bar: Programming
  2. Left panel: All Sources or source folder
  3. Central work area: PREVIEW or PROGRAM
About adding sources

Sources can be added to empty layers or overwrite already existing layers. If no layer is present, then Event Master Toolset will automatically use the first available layer with the source. In case of split layers, the ‘B’ layer comes before the ‘A’ layer.

Wide screen output layer prerequisites

Layers must be added from the screen layer bar before sources can be added. For more information, see “Adding a layer”.

How to add
  1. Click on the desired destination from the top panel or desired screen destination group from the bottom panel.
  2. Is the scene or layer locked ()?

    • If yes, click the unlock icon () in the bottom left of the scene or in the bottom panel (reference 34) and go to next step.

    • If no, go to next step.
    Note: If the layer is a split layer that is transitioned to program, then the layer must either be removed from program or program must be unlocked before it can be edited in preview.
    Image 8–115
    4
    Left align selection
    5
    Vertical middle align selection
    6
    Right align selection
    7
    Top align selection
    8
    Horizontal middle align selection
    9
    Bottom align selection
    10
    Horizontal distribute selection
    11
    Vertical distribute selection
    12
    Make selections same size
    13
    Align selection with the right destination border
    14
    Align selection with the bottom destination border
    15
    Align selection with the center of the destination
    16
    Align selection with the vertical center of the destination
    17
    Align selection with the horizontal center of the destination
    18
    Align selection with the top destination border
    19
    Align selection with the left destination border
    20
    Move selection up in Z-order
    21
    Move selection to top in Z-order
    22
    Move selection to bottom in Z-order
    23
    Move selection down in Z-order
    24
    Size selection to fill horizontal
    25
    Size selection to fill vertical
    26
    Size selection to the source
    27
    Size selection to fill horizontal and vertical
    28
    Cut preview to program
    29
    Transition preview to program
    30
    Transition frames input field
    31
    Execute move animation button
    32
    Crossfade drop down
    33
    Toggle selected layer opacity in software
    34
    Lock or unlock selection
    35
    Arm button
    36
    Toggle selection between preview and program
    37
    Split or unsplit layer
    38
    Merge or unmerge layer
    39
    Match program to preview button
    40
    Reset modifications of selection
    41
    Reset modifications to all layers
    42
    Select all layers
    43
    Freeze selection
    44
    Swap layer modifications between preview and program
    45
    Hide or show selected layer from presets
    46
    Remove selections
  3. Does the desired layer exist?

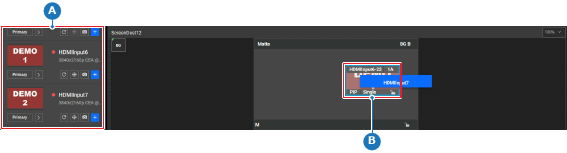
    • If yes, drag (reference A) and drop (reference B, Image 8–116) the desired source from the left panel on the layer.
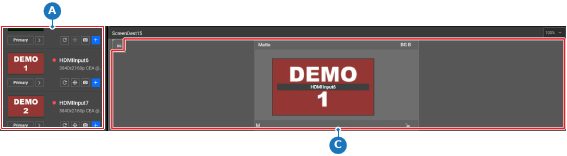
    • If no, drag (reference A) and drop (reference C, Image 8–117) the desired source from the left panel to an empty space of the scene. (not available for wide screens with output layers)
    Note: If the source and screen destination are not from the same unit, then a link resource will be reserved.
    Tip: Collapse all categories and groups in the panel by clicking on the collapse icon ().

    Expand all categories and groups in the panel by clicking on the expand icon ().

    Image 8–116
    A
    Layer drag area
    B
    Layer drop area
    Image 8–117
    A
    Layer drag area
    C
    Layer drop area

    The layer gets the name and thumbnail of the dropped source.

  4. Click the save icon () in the header.