8.10.1 EC-210 communication setup

Note: This menu is only visible in the Event Master Toolset client on an EC-210.
Location
  1. Navigation side bar: Configuration
  2. Left panel: Comm Setup
About the EC-210 communication setup

The EC-210 has two ethernet ports that can be configured independently. These settings dictate how the EC-210 interacts with any network it is connected to. For more information on how to connect the network, see “Connecting an EC-210”.

How to configure
  1. Select the desired method from the drop down after IP Mode (reference 3) of the desired network port.
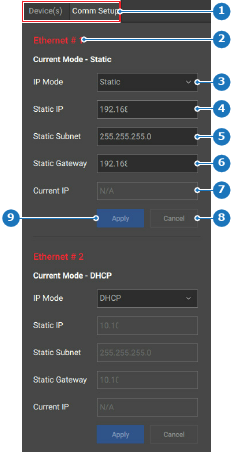
    Image 8–17
    1
    Category selection
    2
    Network port name and status label
    3
    IP mode drop down
    4
    Static IP address input field
    5
    IP address subnet input field
    6
    Default gateway IP address input field
    7
    Current IP address label
    8
    Cancel button
    9
    Apply button
  2. Is the chosen mode DHCP?

    • If yes, wait until the network provides an IP address in the Current IP label (reference 7, Image 8–17). Go to step 4.
    • If no, go to next step.
  3. Set the desired static IP configuration.

    1. Enter the IP address of the EC-210 after Static IP (reference 4, Image 8–17).
    2. Enter the subnet mask that contains the desired IP address after Static Subnet (reference 5, Image 8–17).
    3. Enter the IP address of the default gateway after Static Gateway (reference 6, Image 8–17).
  4. Click Apply (reference 9, Image 8–17).

    The port uses the configuration to connect to the network.