An additional row will be added to the bottom of the table.
Decide the command that must be executed using one of the following methods:
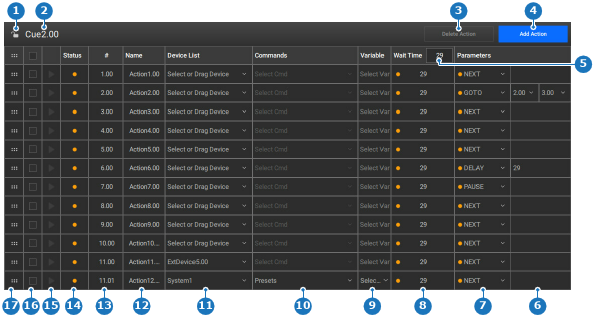
Select a device from the drop down in the column Device List (reference 11, Image 8–144) and select the command from the drop down in the column Commands (reference 10, Image 8–144).
Drag a device from the Device(s) in the left panel and drop them in the column Device List (reference 11, Image 8–144) and select the command from the drop down in the column Commands (reference 10, Image 8–144).
Drag a command from the Device(s) in the left panel and drop them in the Commands (reference 10, Image 8–144) of the central work area.
Is the command variable (reference 9) a drop down menu?
If yes, select the target variable from the drop down in Select Var.
If no, go to next step.
Double click on the field in the Name column (reference 12, Image 8–144) and enter a desired name.
Tip: Provide clear names that reflect the intended purpose.
Double click on the field in the Wait Time column (reference 8, Image 8–144) and enter a desired time in frames.
Note: The default wait time specified at the top of the column will be entered by default.
Decide what must be done after the wait time in the column Parameters (reference 7, Image 8–144).
NEXT, starts the following row.
PAUSE, pauses the cue until it is resumed.
DELAY, waits an additional specified frames before continuing. (by default, the specified wait time is entered)
GOTO, jumps to the specified action from a specified cue.
Tip: If more than 12 actions are needed, set the last action to the start of a second cue.
Reorder the cue using one of the following methods:
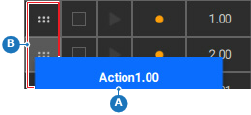
Drag the field in the first column (reference A) of the desired row and drop it (reference B) on the desired location.
Double click on the number (reference 13, Image 8–144) and enter the desired placement of the row.
Note: Numbers must be unique.
Note: Moving a column will change its number to reflect its new position. If that number is already in use, then the move cannot be done with drag and drop.
Tip: Up to two decimal numbers are allowed.
Tip: The rows are always sorted from lowest to highest number in the # column.
Image 8–145
A
Dragged action
B
Drop area
Use the play (), pause () and stop () buttons at the bottom of the right panel to test the cue.

 ) and not be playing (
 ) nor paused (
 ) before edits can be made.

 ), pause (
 ) and stop (
 ) buttons at the bottom of the right panel to test the cue.
 ) in the header.