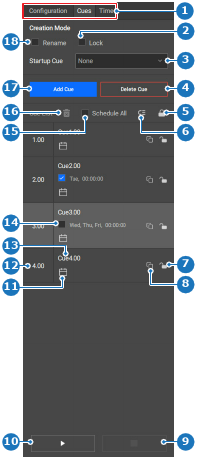
8.13.4 Creating a cue

Location
  1. Navigation side bar: External Devices & Cues
  2. Right panel: Cues
How to create
  1. Decide how the cue must be created in Creation Mode. (optional)

    • Check the check box in front of Rename (reference 18) if the created cue will be named immediately.
    • Check the check box in front of Lock (reference 2) if the cue must be locked for editing.
    Image 8–143
    1
    Category selection
    2
    Lock new cue check box
    3
    Startup cue drop down
    4
    Delete selected cue button
    5
    Lock all cues
    6
    Reorder cues
    7
    Lock or unlock specific cue
    8
    Copy cue
    9
    Stop current cue
    10
    Play or pause current cue
    11
    Scheduling menu
    12
    Cue ID input field
    13
    Cue name input field
    14
    Cue schedule check box
    15
    Schedule all cues check box
    16
    Remove schedule from selected cue
    17
    Add cue button
    18
    Rename new cue check box
  2. Was the option Rename (reference 18, Image 8–143) selected?

    • If yes, enter a name (reference 13, Image 8–143) for the cue.
    • If no and the cue is unlocked (), double click on the name (reference 13, Image 8–143) and enter a name.
    Tip: Provide clear names that reflect the intended purpose.
  3. Double click on the number in front of the preset (reference 12, Image 8–143) and enter a desired number. (optional)

    Note: Numbers must be unique.
    Tip: Up to two decimal numbers are allowed.
    Tip: The automatic numbering will ignore decimal numbers and add one to the highest whole number in the list.
    Tip: The number decides at which position it is located in the list.
  4. Click the save icon () in the header.
  5. Manage the created cue. For more information, see “Managing actions”.