6.2.1 ClickShare system setup

About the ClickShare system setup

The first part of the configuration wizard will configure the ClickShare Base Unit. All settings can be changed at a later time.

Prerequisites

The Base Unit must be connected to the LAN network. For more information, see “Connecting over LAN”.

A method of interacting with the wizard will also be needed. At least one of the following options must be available:

How to setup
  1. Is a Control Panel connected to the Base Unit?

    • If yes, go to next step.
    • If no, go to step 4.
  2. Select the installed orientation of the Control Panel.

    Image 6–2
    1
    Low angle view orientation
    2
    High angle view orientation
    3
    Confirm button

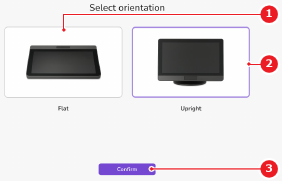
    The user interface rotates based on the selected orientation.

  3. Tap Confirm (reference 3, Image 6–2).

    The language page is shown.

  4. Select the desired language from the language list (reference 4).
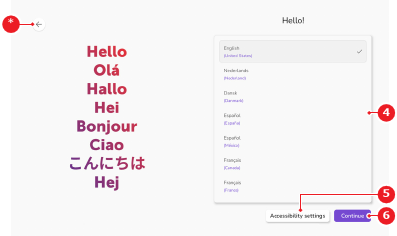
    Note: English will be selected by default.
    Image 6–3
    4
    Language list
    5
    Accessibility settings button
    6
    Confirm button
    *
    Return button
  5. Tap Accessibility settings (reference 5, Image 6–3) to adjust the user interface. (optional)

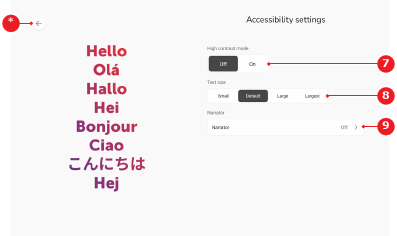
    1. Select the desired text and button look after High contrast mode (reference 7).

      • Off (default)
      • On
    2. Select the desired size of the text after Text size (reference 8).

      • Small
      • Default (default)
      • Large
      • Largest
    3. Tap Narrator (reference 9) to configure the narrator. For more information, see “Narrator”.

      Tip: The images in the linked chapter have a different appearance than in the configuration wizard. Functionality and location of the elements are the same.
    4. Tap the return button (reference *) to return to the language page.
    Image 6–4
    7
    High contrast status
    8
    Text size options
    9
    Narrator menu
    *
    Return button
  6. Tap Continue (reference 6, Image 6–3).

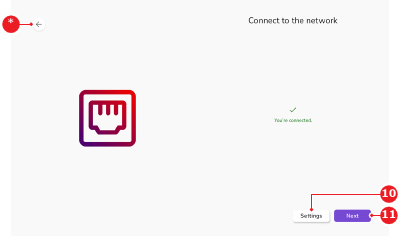
    The network configuration page is shown.

  7. Tap Settings (reference 10) to adjust the network settings. For more information, see “Ethernet status”.

    Note: A valid network connection is required to continue the setup.
    Tip: The images in the linked chapter have a different appearance than in the configuration wizard. Functionality and location of the elements are the same.
    Image 6–5
    10
    Settings menu
    11
    Next button
    *
    Return button

    A label You’re connected. () is shown.

  8. Tap Next (reference 11, Image 6–5).

    The date and time page is shown.

  9. Select the desired time zone from the drop down after Select time zone (reference 13).

    Image 6–6
    12
    Current system time
    13
    Time zone drop down
    14
    Time format toggle
    15
    Time server menu
    16
    Next button
    *
    Return button
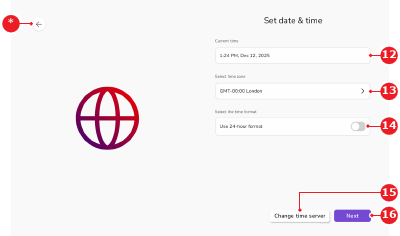
  10. How must the time be displayed?

    • In case of 12-hour format, disable the Use 24-hour format button (reference 14, Image 6–6).
    • In case of 24-hour format, enable the Use 24-hour format button (reference 14, Image 6–6).
  11. Configure the time server that the ClickShare system must follow. (optional)

    1. Tap Change time server (reference 15, Image 6–6).

      A pop-up screen is shown.

    2. Enter the desired time server IP address or hostname in the input field (reference 17).

      Note: The default time server is time.android.com.
    3. Tap Save (reference 19).
    Tip: The pop-up can be closed by tapping Cancel (reference 18) or by tapping outside the pop-up window.
    Image 6–7
    17
    Time server input field
    18
    Cancel button
    19
    Save button

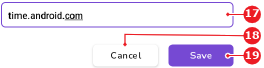
    The time settings are synced to the entered time server.

  12. Must any settings from previous steps be changed?

    • If yes, use the return button () to change the desired setting.
    • If no, tap Next (reference 16, Image 6–6) to continue the configuration. For more information, see “Software and terms”.
    Note: It is not possible to return after this step.