Overview
In this integration mode, the ClickShare Base Unit is connected to a dedicated physical or virtual LAN via a cabled network. The Base Unit's wireless access point function is typically disabled. Corporate users as well as guests share directly via the ClickShare Button, via the ClickShare App and with their mobile devices using Airplay, Google Cast or Miracast if they are connected to the dedicated LAN or Enterprise network. This setup allows for more fine grained access control or to separate the ClickShare network traffic from all other IP traffic to ensure business requirements in terms of bandwidth and latency.
Note: The ClickShare Buttons are also connected to the dedicated LAN and all sharing traffic travels through that LAN to the Base Unit. When using a ClickShare Button or ClickShare App for sharing, all users can keep their computers connected to any of the other connected networks and still have corporate and internet access. Mobile users will be able to access the internet on the corporate LAN if the network configuration allows it.
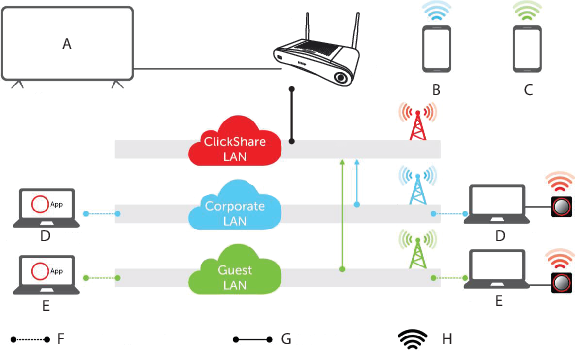
- A
- Meeting room screen
- B
- Employee mobile
- C
- Guest mobile
- D
- Employee laptop
- E
- Guest laptop
- F
- Wireless or Ethernet connection
- G
- Ethernet connection
- H
- Wireless connection
This setup is used to integrate ClickShare into a dedicated network because a connection to an existing network is not required or wanted. It is preferred for large Enterprise installations where security constraints are strict, such as for Banks, Defense industry, Government, etc.