5.8 System menu > USB device (Backup/Restore)

General

The unit's front panel contains a USB port that you can use to connect a flash drive to the Event Master unit.

Note: The flash drive must be formatted to use the FAT32 file system. For formatting instructions, refer to section Formatting the flash drive in the section “Upgrading firmware using the USB port”.

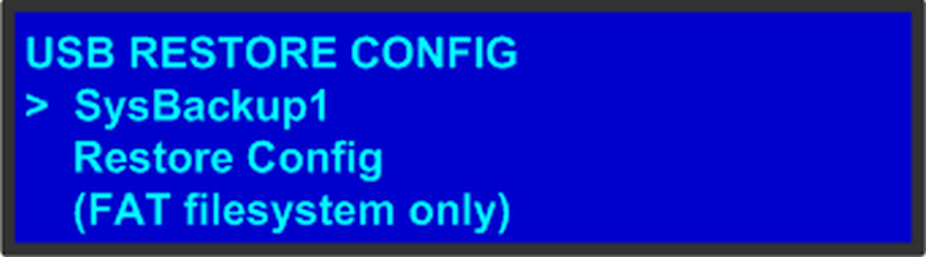
The following illustration shows the USB Backup/Restore submenu, which you access from the System menu.

Image 5–9 USB submenu

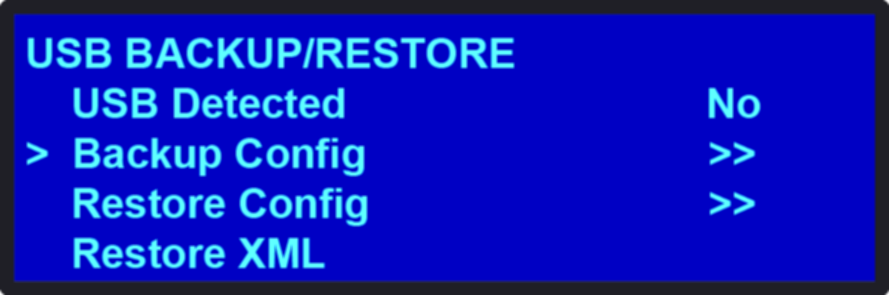
Using this menu, you can:

How to back up a configuration file to a flash drive
  1. Insert a formatted flash drive in the unit’s front-panel USB port.
  2. From the System menu, scroll to the USB Backup/Restore submenu. Select Backup Config.

    The USB Backup Config submenu appears, as shown in the following illustration. The navigation cursor appears at the default name for the first backup file.

    Image 5–10 USB Backup Config submenu
  3. If you wish to change the default name of the backup configuration, press SEL. Use the ADJUST knob to change the name, as described in section “Using menu system”. Press SEL again when you complete the name change.
  4. Scroll to Backup Config and press SEL.

    A confirmation message appears when the backup is complete.

    If the backup operation fails, the message shown in the following illustration appears. Check that the flash drive is properly formatted and installed, and try again.

    Image 5–11
How to restore a system configuration file that is stored on a flash drive
  1. Insert a formatted flash drive in the unit’s front-panel USB port.
  2. From the System menu, scroll to the USB Backup/Restore submenu. Select Restore Config.

    The USB Restore Config submenu appears, as shown in the following illustration.

    Image 5–12
  3. Press SEL and scroll through the list of configuration files. When you locate the file you want, press SEL again.
  4. Scroll to Restore Config and press SEL.

    A message confirms the restore operation and instructs you to reboot the Event Master unit.

Note: You must reboot the Event Master unit to use the restored configuration file.
How to create a configuration offline and transfer it to a live unit

When working in the Event Master Toolset Software with a simulator, it is now possible to create a configuration offline and then transfer it to a live unit.

  1. System creation:

    1. Create your system offline using the simulator. This includes system configuration, presets, MVR, etc ...
    2. Save the simulated configuration.

      Press the Save icon (the floppy disk icon in the lower left-hand corner of the screen).

  2. Copy the XML file to the USB device:

    1. Open Windows File Explorer.
    2. Locate and select the Barco folder on your C: drive.

      Image 5–13
    3. Locate in the Barco folder and select the Event Master Toolset folder that corresponds to the current version you are using.

      Image 5–14
    4. Select the wvp_9876 subfolder.

      Image 5–15
    5. Open the xml folder.

      Image 5–16

      The xml folder contains subfolders for presets, stills, and userkeys, and it contains the configuration settings file for your simulated system.

    6. Create a folder on your desktop called EM, and create a subfolder inside it called Backup.
    7. Copy and paste the xml folder from the wvp_9876 folder into the EM\Backup folder.
    8. Open the xml folder in the EM\Backup folder.
    9. Rename the settings.xml file to settings_backup.xml.

      Make sure that you do not change the file extension.

    10. Copy and paste the entire EM folder from your desktop to the root directory of a FAT32-formatted USB drive.
  3. Import the simulated configuration created offline to the live system:

    1. Insert the USB drive into the USB port on the front of a live Event Master processor.

      The live processor must be the same type as the simulated processor. If your simulated processor is an E2 Lite, the live processor must be an E2 Lite; if your simulated processor was an S3–4K, your live processor must be an S3–4K. The card setup on the simulated system must match the card setup on the live system, otherwise Inputs might not match, or Destinations might be created on nonexistent Outputs. Those Destinations will be grayed out, and you’ll have to recreate them.

    2. Navigate on the front-panel display screen to the System menu, then to USB Backup/Restore, and then to Restore XML, and then hit Select.

      The system uploads the backup xml folder. When finished, the display screen reads “Restore successful.”

    3. Select Yes (<SEL>), when the system asks “Reset unit now?”

      The unit begins to reset. This takes about two minutes.

    4. Remove the USB drive.

    Once the system resets, all the Inputs, Outputs, Destinations Presets, etc. from the simulated unit will have been transferred to the live unit.

    The icons from the simulated unit do not transfer to the live unit and must be recreated.

    If the Multiviewer configurations are not transferred, they must be recreated.