Availability
- Operating system: Windows and MacOS
- Base Unit: CB Core and CB Pro
- Room feature: 4th gen Button (optional)

Virtual remote  allows a user to control the CB Core and CB Pro audio and camera settings remotely. There is a standalone remote and quick actions section on the sharing page of the ClickShare App. Which functions are available can be found in the following table:
| Feature | Standalone | Quick actions |
| Mute/unmute microphone | - | X |
| Mute/unmute speakers | X | X |
| Speaker volume control | X | X |
| Camera modes | X | X |
| Fixed position adjustment | X | - |
The CB Core and CB Pro support different framing modes for the camera. These modes use AI to achieve the specific framing. The following modes are available:


Group framing  allows the ClickShare to digitally zoom and pan the captured image to focus dynamically on the participants. ClickShare detects where the attendees are sitting and cuts everything surrounding the attendees out of the image. This minimizes the amount of room that gets shown and allows for a more focused image.
There are no additional settings to manage for this feature.
To ensure that the speaker is the center of attention, speaker framing  digitally zooms and pans the captured image to focus on the attendee that is currently talking. ClickShare automatically detects and switches the focus when another attendee takes over as speaker. Ensuring that the meeting camera image is always on the person talking.
There are no additional settings to manage for this feature.
A more advanced version of group framing. composition framing  detects each individual attendee, cuts out as much of the background for each and assembles each cutout into a composite image. This composite image has removed as much of the background as possible and can show two attendees sitting physically far as sitting right next to each other. A full unedited view will be shown under the composite image to give a sense of perspective.
There are no additional settings to manage for this feature.
Fixed position  allows for the cropping of the ultra-wide image to simulate physical panning or tilting. Combine these two actions with the digital zoom of the camera for more precision of the area that is shown in the meeting.
The user device must be connected to the ClickShare system. For more information, see:
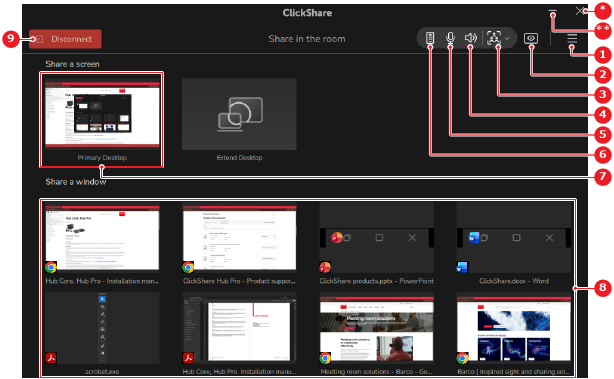
Click the  microphone icon (reference 5) to mute or unmute the microphone.
The microphone icon on the meeting room displays turns green when in use and red when muted.
Click the standalone remote button (reference 6, Image 10–1). (optional)
A standalone remote pop-up is shown.
Mute or unmute the speakers using one of the following methods:
 speaker icon (reference F). speaker icon (reference 4, Image 10–1).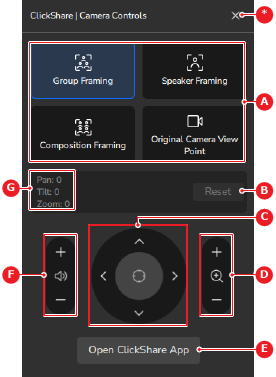
The speakers icon on the meeting room displays turns green when in use and red when muted.
Adjust the volume of the speaker using one of the following methods:
standalone remote, click the  to increase the volume or the
  to decrease the volume from the speaker controls (reference F, Image 10–2). speaker icon (reference 4, Image 10–1) and click on the to increase the volume or the to decrease the volume.
Select the camera mode using one of the following methods:
standalone remote for any mode, click on the camera mode (reference A, Image 10–2). standalone remote for fixed position, go to next step.The camera icon on the meeting room displays turns green when in use.
Adjust the camera view. (only for original camera view point)
Click the to increase the zoom or the to decrease the zoom from the zoom controls (reference D, Image 10–2).
The zoom value is changed in the position values (reference G, Image 10–2).
Click the  to pan to the right or the
  to pan to the left from the tilt and pan controls (reference C, Image 10–2).
The pan value is changed in the position values (reference G, Image 10–2).
Click the  to tilt upwards or the
  to tilt downwards from the tilt and pan controls (reference C, Image 10–2).
The tilt value is changed in the position values (reference G, Image 10–2).
 zoom icon resets the zoom to the default value.
 position icon resets both the tilt and zoom to the default value.