8.10.2 System creation

Location
  1. Navigation side bar: Configuration
  2. Left panel: Device(s)
About system creation

Each created system is added to the multi-system list in the header. For more information on how to switch between systems, see “Multi-systems”.

Note: It is not possible to add the same unit to multiple systems.
About units

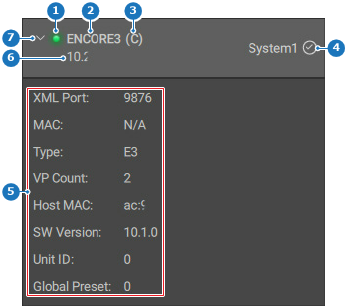
When starting up, Event Master Toolset scans the connected network for compatible units. Previous connections and IP addresses are also recalled. These two are combined into a list in the left panel, where detailed information about the units is displayed.

Image 8–18
1
Connection indicator
2
Unit type
3
Host-client indicator
4
System the unit is a part of
5
Unit details
6
Unit IP address
7
Show or hide the unit details
How to create
  1. Is the desired unit already part of a system?

    • If yes, go to next step.
    • If no, click on the + () in the top panel and go to next step.
    Note: It is not possible to add the same unit to multiple systems.
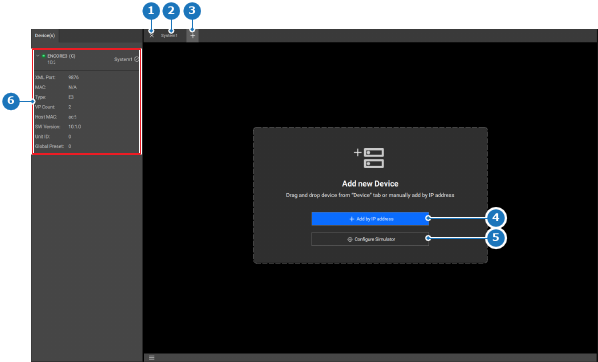
    Image 8–19
    1
    Disconnect system
    2
    System name
    3
    New system button
    4
    Manual add by IP address button
    5
    Simulator configuration link
    6
    Unit details
  2. Are the desired units visible in the left panel?

    • If yes, drag the desired entry (reference 6, Image 8–19) from the left panel and drop it in the central work window. Go to step 5.
    • If no, go to next step.
  3. Which type of system must be added?

    • For a simulator, click on Configure Simulator (reference 4, Image 8–19). For more information on how to configure the simulator, see “The simulator”.
    • For working hardware, click on + Add by IP address (reference 5, Image 8–19) and go to next step.
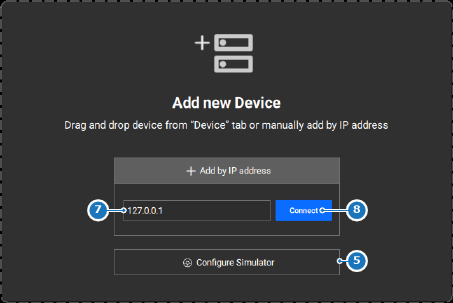
  4. Enter the IP address into the input field (reference 7) and click Connect (reference 8).

    Image 8–20
    5
    Simulator configuration link
    7
    IP address input field
    8
    Connect button

    Connection with the unit is established.

  5. Is multi-operator setup? For more information, see “Multi-operator mode”.
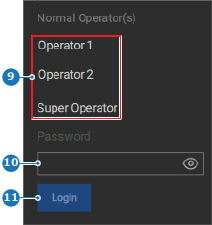
    • If yes, select the desired operator (reference 9) from the pop-up and click Login (reference 11).
    • If no, go to next step.
    Note: If the selected operator is the Super Operator, then enter the password in the input field (reference 10). The default Super Operator password is ‘password’.
    Image 8–21
    9
    List of available operators
    10
    Super Operator password input filed
    11
    Login button
  6. Is this unit part of a linked system?

    • If yes, add additional units to the system. For more information, see “Linking units”. Go to next step.
    • If no, wait until the central work window is populated with the added unit. Go to next step.
  7. Rename the system by double clicking on the current name in the top panel (reference 2, Image 8–19). (recommended)

    Tip: Provide clear names that reflect the intended purpose.