5.3.1 Connecting the USB cable

About Control Panel connection

The Control Panel has one ‘USB-C’ port. This port will both power and transfer data between the Base Unit and the Control Panel using the DisplayPort Alt Mode protocol. This connection must be made in one of two ways:

DisplayPort Alt Mode
DisplayPort alternate mode allows compatible USB-C ports to function as DisplayPort ports. These ports can send DisplayPort signals alongside any other data or power that is normally supported by standard USB ports.
About the Barco USB-C cable kit

The Barco 10m directional ‘USB-C’ cable has a ‘Display’ side and a ‘Source’ side. The ‘Display’ side must always be connected to the Control Panel. If the ‘Source’ side is connected to the Control Panel, then no connection will be possible.

This cable uses optical fibres to ensure sufficient data bandwidth and power transfer capabilities while supporting DisplayPort Alt Mode. Avoid routing the cable through sharp bends to protect the fibre internals.

About the USB-C Extension over CAT kit

The USB-C Extension over CAT kit consist of a transmitter, a receiver and two ‘USB-C’ cables that support DisplayPort Alt Mode. The transmitter converts the DisplayPort Alt Mode signal from the Control Panel to HDBaseT. HDBaseT uses an RJ-45 cable (not included) to send the signal over long distances. The receiver then converts the HDBaseT signal back to DisplayPort Alt Mode for the Base Unit.

A compatible RJ-45 cable must be selected. For more information on the recommendations, see “Selecting an RJ-45 cable”.

HDBaseT
HDBaseT is a signal standard designed to transmit data over long distances without loss of information. HDBaseT can be configured to transmit a variety of data from video signals to commands over the same standard network cables.
RJ-45 cable
An RJ-45 cable is a network cable that ends in a RJ-45 connector. Many different cables are compatible with an RJ-45 connector. For this reason, the cables are divided in categories based on maximum speed and cable design. These differences have a big impact on the quality of the RJ-45 cable.
Required tools

Phillips screwdriver PH1

Required parts
How to connect
  1. Place the Control Panel on its back.

    Caution: Do not place the Control Panel on its screen.
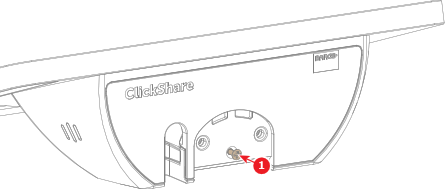
  2. Loosen the bottom screw (reference 1). Use a PH1 Phillips screwdriver.

    Image 5–24
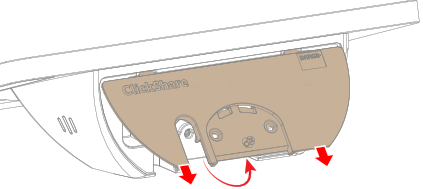
  3. Remove the bottom cover as illustrated.

    Image 5–25
  4. What ‘USB-C’ cable is used?

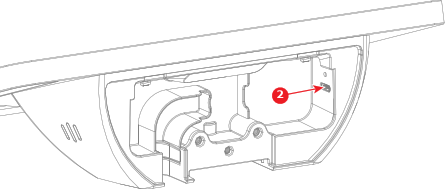
    • In case of the Barco ‘USB-C’ cable, connect the ‘Display’ side of the cable to the ‘USB-C’ port (reference 2, Image 5–26).
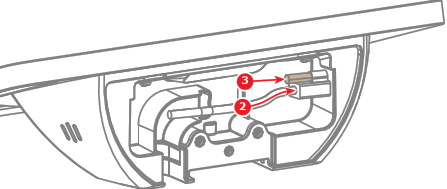
    • In case of the USB-C Extension over CAT kit, connect the ‘USB-C’ cable to the ‘USB-C’ port (reference 2, Image 5–27) and tighten the screw lock (reference 3, Image 5–27). Use the ‘USB-C’ cable with a screw lock on both connectors.
    Image 5–26 Regular USB-C cable
    Image 5–27 USB-C Extension over CAT USB-C cable
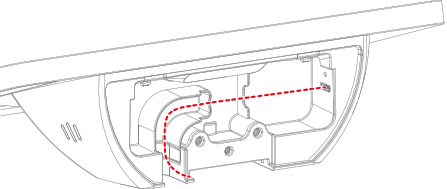
  5. Route the ‘USB-C’ cable as illustrated.

    Image 5–28
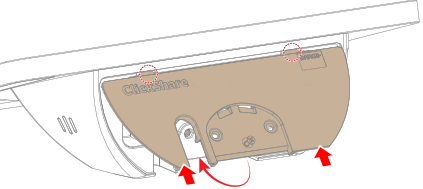
  6. Install the bottom cover as illustrated.

    Image 5–29
  7. Tighten the bottom screw (reference 1) to secure the bottom cover. Use a PH1 Phillips screwdriver.

    Image 5–30
  8. Install the Control Panel in the desired orientation:

    OrientationInstalledSecured
    Low angle view
    High angle view