This is an example on setting up Barco Single sign-on with Microsoft Azure as your Identity Provider (IDP).
To find detailed steps using Barco Management Suite, see Quick start guide for Barco Single Sign-on.
OpenID Connect v1.0
- Navigate to Azure portal and search for the resource
Azure Active Directory. - On this page, under the
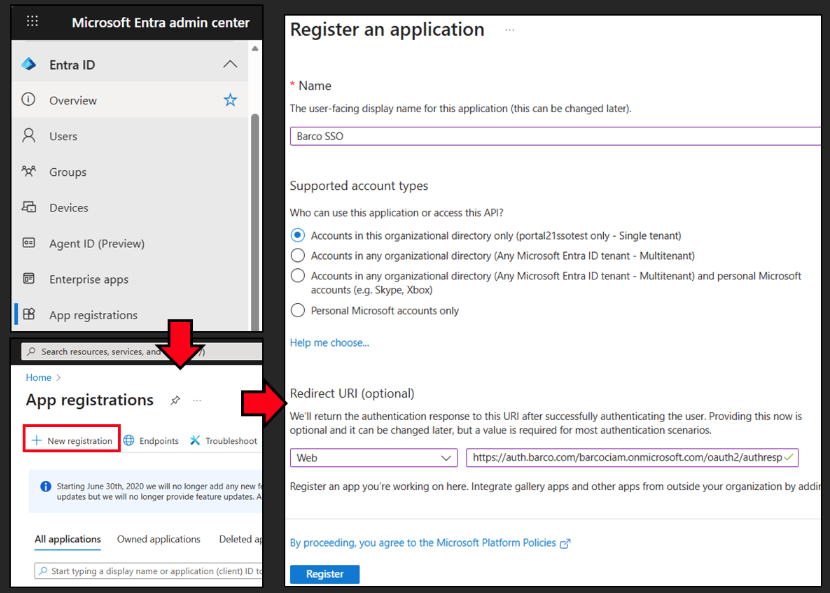
Managetab find and go to App Registrations → New registration.- Enter any appropriate Name for this application for you to track it by.
- Under
Supported account types, the API access selection may be left to default (Single Tenant). - Under the
Redirect URI, select platform as Web and past the Redirect URI and click on Register. You will now be navigated to the overview page for this new registration.
- Under
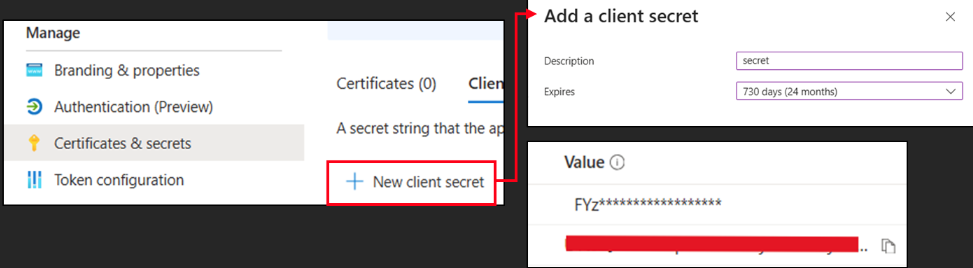
Managesection, navigate to Certificates & secrets → New client secret.
- Go to
Overview, under theEssentialssection and copy the Application (Client) ID and save it somewhere. - Add Optional claims, only when either
upn, given_name or family_nameis not present in user properties by going to Token configuration (see Microsoft Docs). - Navigate to the Single sign-on settings page on Barco Management Suite:
- Click on Add Configuration
- Enter a name for the configuration and select protocol as OpenID Connect v1.0
- Complete the form on the Single sign-on settings page in Barco Management Suite:
- For Discovery URI enter "
https://login.microsoftonline.com/{tenant}/.well-known/openid-configuration" where{tenant}is the domain name of Azure AD tenant or it's GUID identifier (see Microsoft Docs). - Optionally, add your own scopes to the Scope field.
- For Client ID, enter the Application ID copied earlier.
- For Secret, enter the client secret Value that was saved earlier.
- Optionally, change the Claims when you've specified your own before.
- Save this configuration by clicking on Save.
- For Discovery URI enter "
- Test the Configuration in Barco Management Suite
Note: Any update or creation of new single sign-on configuration can take up to 30 minutes to propagate across all regions.- When the specified time has passed after updating or creation of the configuration, go to action menu for the configuration and click on Test.
- You will be prompted to login on your IDP to test the single sign-on.
- After successful sign in, the claims returned are shown on this screen.
- If a claim isn’t returned, check the claims mapping match between the IDP and the configuration in BMS.
- After successful completion of the test, proceed to assigning your account’s domain(s) in next step.
- Activate Single Sign-on settings in Barco Management Suite
- For the domain you want to assign this configuration, go to options → Edit Assignment.
- Select the Configuration by name and click on Save.
- Finally, for the same domain, go to options → Enable the Single sign-on configuration.
SAML v2.0
- Navigate to Azure portal and search for the resource
Azure Active Directory. - On this page, go to Manage → Enterprise applications → New application.
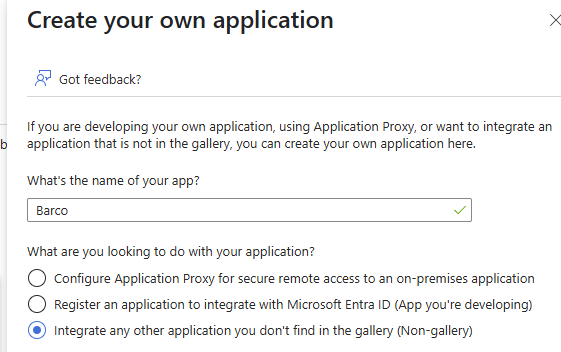
- Click on Create your own application
- Enter any appropriate
Namefor this application for you to track it by - For the query
What are you looking to do with your application?, select option:Integrate any other application you don’t find in the gallery (Non-gallery) - Click Create.
- Navigate to Manage → Single sign-on and select SAML as single sign-on method.
- You will now be taken to setup page for
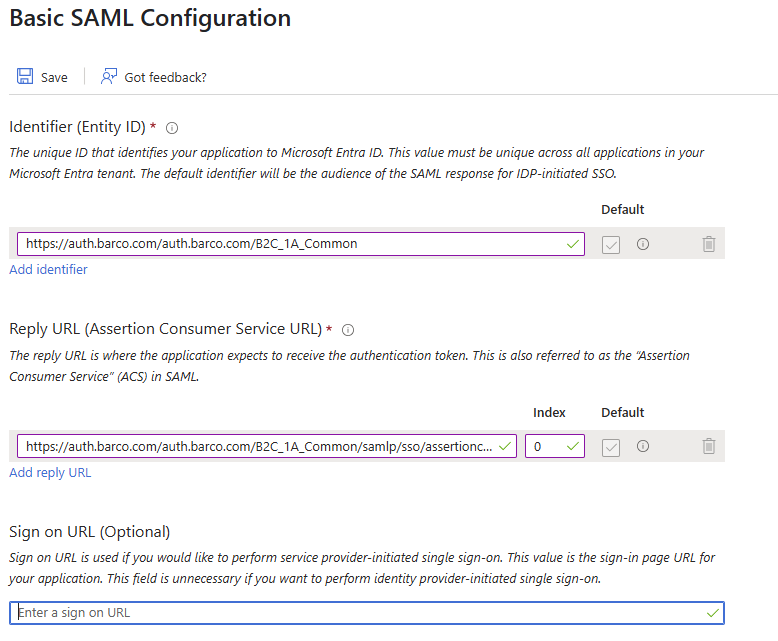
Single Sign-on with SAML, from where we will get the metadata file for your application. - Use the SAML endpoints for Basic configuration:
- Identifier (Entity ID):
https://auth.barco.com/auth.barco.com/B2C_1A_Common - Reply URL (ACS URL):
https://auth.barco.com/auth.barco.com/B2C_1A_Common/samlp/sso/assertionconsumer
Index: 0
- Identifier (Entity ID):
- Click Save.

- You will now be taken to setup page for
- Add/modify attributes in the Attributes & Claims section only if:
- The Email is not the User principal name for the users in your tenant.
- The First name or Last name is not populated for the users in your tenant
- Go to section SAML Certificates
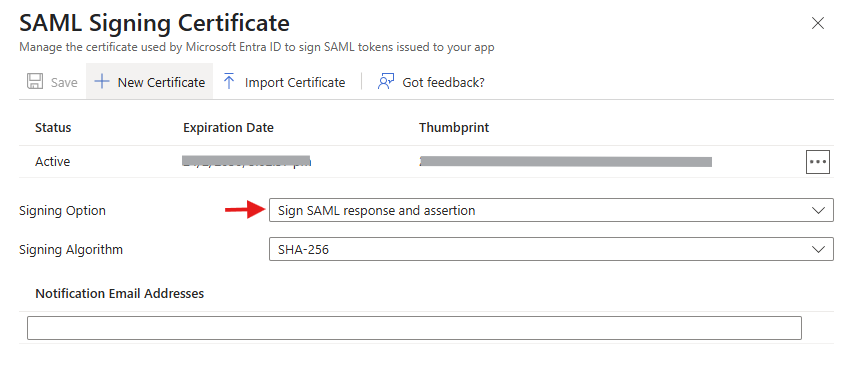
- Edit → Select Signing Option and change it to
Sign SAML Response and Assertionand clickSave.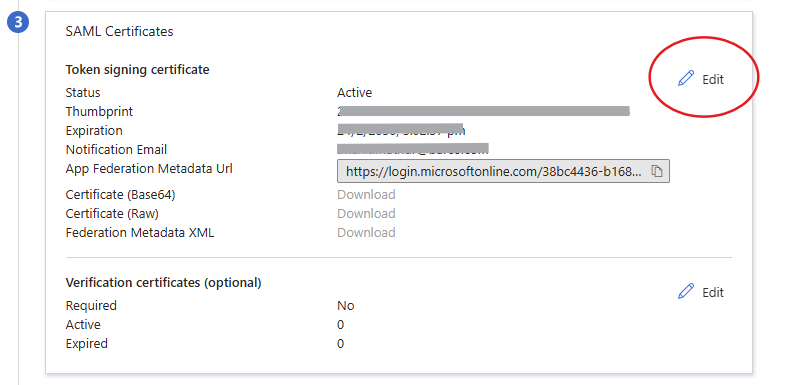
- Download Federation Metadata XML.
- Edit → Select Signing Option and change it to
- Go to the Single Sign-on settings page on Barco Management Suite
- Click on Add Configuration
- Enter a name for the configuration and Select protocol as SAML v2.0
- Optionally, change the Assertions for Email, First name or Last name.
Email
assertionSubjectName
This keyword signals Barco to pick the email from the Subject of the SAML Response. Change it only when the Email is not coming in the UPN.
First name
http://schemas.xmlsoap.org/ws/2005/05/identity/claims/givenname
Last name
http://schemas.xmlsoap.org/ws/2005/05/identity/claims/surname
- For Your metadata, select the federation metadata file obtained from your IDP & click Upload.
- Set the Signing algorithm under SAML certificate, according to the configuration on your IDP.
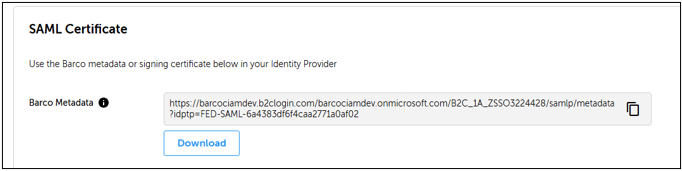
- After the metadata has been uploaded, download the Barco metadata file by clicking the download button
Note: If the Barco metadata doesn’t start downloading, you may need to check your browser settings.
- Navigate back to Azure portal tab on the setup Single sign-on page:
- Click on Upload metadata file → Select file → Add.
- After the metadata file uploaded successfully, click on Save.

-
Test the Configuration in Barco Management Suite
Note: Any update or creation of new single sign-on configuration can take up to 30 minutes to propagate across all regions.- When the specified time has passed after updating or creation of the configuration, go to action menu for the configuration and click on Test.
- You will be prompted to login on your IDP to test the single sign-on.
- After successful sign in, the claims returned are shown on this screen.
- If a claim isn’t returned, check the claims mapping match between the IDP and the configuration in BMS.
- After successful completion of the test, proceed to assigning your account’s domain(s) in next step.
- Activate Single Sign-on settings in Barco Management Suite.
- For the domain you want to assign this configuration, go to options → Edit Assignment.
- Select the Configuration by name and click on Save.
- Finally, for the same domain, go to options → Enable the Single sign-on configuration
Manage which users can access this SSO configuration
Azure AD allows an option to prevent everyone from signing in to an application by requiring user assignment (see Microsoft Docs).
You can make changes to this by following these steps:
- Go to Enterprise applications, and then search for and select the application you have created for this SSO.
- To give access to all users, turn off user assignment:
- Under Manage, go to Properties.
- Set option Assignment required to No and click Save.

- To give access to specific users, turn on user assignment:
- Under Manage, go to Properties.
- Set option Assignment required to Yes and click Save.

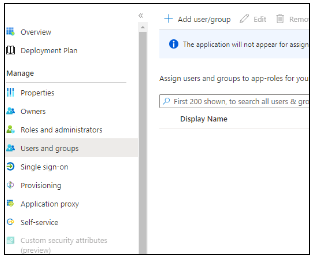
- Now you can assign specific users by going to the Users and groups page and selecting Add user/group (see Microsoft Docs).